Add the following lines to the /etc/apache2/sites-enabled/000-default.conf file in side <VirtualHost *:80> </VirtualHost> block (In debian based linux)
RewriteEngine On
RewriteCond %{HTTPS} !on
RewriteRule (.*) https://%{HTTP_HOST}%{REQUEST_URI}
Showing posts with label debian. Show all posts
Showing posts with label debian. Show all posts
Friday, November 12, 2021
How to redirect http requests to https?
Wednesday, July 19, 2017
How to get the serial number of your network device in linux?
1. sudo lshw -C network | grep -i serial
lshw - Command used to list the details of all available hardware in a system.
-C - Option used to specify hardware "class".
network - We asked "lshw" to list only the network devices.
grep - Command used to print lines that matches the given pattern
-i - Option used to ignore case sensitivity
serial - Pattern used to fetch the lines that contains the word "serial"
Example:
$sudo lshw -C network | grep -i serial
[sudo] password for
serial: 78:f2:9e:f3:88:e7
2. /sbin/ifconfig | grep -i hwaddr or sudo ifconfig | grep -i hwaddr
ifconfig-Command used to configure network devices.
grep - Command used to print lines that matches the given pattern
-i - Option used to ignore case sensitivity
serial - Pattern used to fetch the lines that contains the word "serial"
Example:
$/sbin/ifconfig | grep -i hwaddr
eth0 Link encap:Ethernet HWaddr 78:f2:9e:f3:88:e7
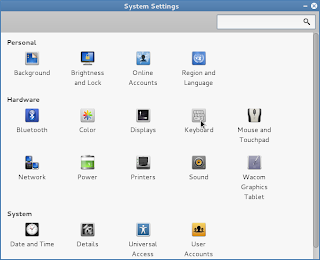
3. GUI Way
Applications -> System Tools -> Settings
You will land in the following screen
 | |||
| Settings panel |
Click on Network the following window will be open
 |
| Network settings panel |
The green highlighted part is our interest.
Monday, January 9, 2017
How to resolve "no suitable module for running kernel found" error in virtualbox instalation in debian linux?
1. Check wheather you machine is installed with
"linux-headers-,
linux-image-"
by issueing the follwing command in terminal.
$dpkg -l | grep linux
In my case my kernel version is "3.16.0-4-686-pae" so the output of the above command would be something like as follows,
If you don't find any linux-headers or linux-images then you must install them first.
2. To find the your kernel version use the following command
$uname -a
[ My output -> Linux hostname 3.16.0-4-686-pae #1 SMP Debian 3.16.36-1+deb8u2 (2016-10-19) i686 GNU/Linux ]
now install the required packages specified in step 1.
3. Uninstall your previous virutalbox package and reinstall it.
$sudo apt-get remove --purge virtualbox
$sudo apt-get instlal virtualbox
4. Restart you machine.
by issueing the follwing command in terminal.
$dpkg -l | grep linux
In my case my kernel version is "3.16.0-4-686-pae" so the output of the above command would be something like as follows,
 | |||||||
| Missing linux headers package |
If you don't find any linux-headers or linux-images then you must install them first.
2. To find the your kernel version use the following command
$uname -a
[ My output -> Linux hostname 3.16.0-4-686-pae #1 SMP Debian 3.16.36-1+deb8u2 (2016-10-19) i686 GNU/Linux ]
now install the required packages specified in step 1.
3. Uninstall your previous virutalbox package and reinstall it.
$sudo apt-get remove --purge virtualbox
$sudo apt-get instlal virtualbox
4. Restart you machine.
Wednesday, October 5, 2016
How to enable ssh access for root user in Linux (debian based)?
1. Edit the /etc/ssh/sshd_config file as sudo(or root) user
$sudo vim /etc/ssh/sshd_config
2. Modify the "PermitRootLogin" value as "yes" under "Authenticaton" Section
After editing your sshd_config file's Authentication section will look like
3. Save the changes (esc :wq)
4. Restart the ssh service
$sudo /etc/init.d/ssh restart
5. Now check root login via ssh from a remote machine
(From a another/remote machine)
$ssh root@
Note:
The parameter PermitRootLogin can take any of the following values namely,
yes, without-password, forced-commands-only, no
PermitRootLogin
"yes" = ssh root login allowed
"without-password" = password authentication is disabled for root.
"forced-commands-only" = root login with public key authentication will be allowed,
but only if the command option has been specified. All
other authentication methods are disabled for root.
"no" = root is not allowed to log in.
$sudo vim /etc/ssh/sshd_config
2. Modify the "PermitRootLogin" value as "yes" under "Authenticaton" Section
After editing your sshd_config file's Authentication section will look like
 |
PermitRootLogin yes |
4. Restart the ssh service
$sudo /etc/init.d/ssh restart
5. Now check root login via ssh from a remote machine
(From a another/remote machine)
$ssh root@
Note:
The parameter PermitRootLogin can take any of the following values namely,
yes, without-password, forced-commands-only, no
PermitRootLogin
"yes" = ssh root login allowed
"without-password" = password authentication is disabled for root.
"forced-commands-only" = root login with public key authentication will be allowed,
but only if the command option has been specified. All
other authentication methods are disabled for root.
"no" = root is not allowed to log in.
Monday, June 29, 2015
How to dist-upgrade BOSS GNU/Linux?
I am user of BOSS GNU/Linux version 5.0(code name: anokha) since a few years and i am content with it. It's been about a year that the next version 6.0 (code name: anoop) is out there for public usage, I am bit afraid to upgrade my machine. There are two reasons for my hesitation,
1. I am completely adapted(/addicted) to BOSS 5.0, and pretty much comfortable with it. I don't want to lose my comfortableness.
2. I afraid to dist-upgrade, which many a time leads to -> at minimum inconsistency & at maximum machine crash.
So, what made me to upgrade my linux box?
It's been about 2 years since my last bug-fix to LibreOffice office suite. And that FOSS contribution itch starts now again. So, I decide to download & compile the source code LibreOffice in my Linux box. But, Unfortunately when I to do so I end up with the error
"libo/sal/qa/rtl/strings/test_oustring_stringliterals.cxx: In member function ‘void test::oustring::StringLiterals::checkOUStringLiteral1()"
libo/sal/qa/rtl/strings/test_oustring_stringliterals.cxx:195:48: internal compiler error: Segmentation fault
As the reason pointed out by the LibreOffice developers, I have to use gcc-4.8 or higher version to compile the LibreOffice source. But, It's not available with BOSS 5.0 (which derived from Debian release wheezy) and the same is with debian also (even backports also don't have gcc-4.8). This leads to only one solution i.e upgrading the machine.

Now, The steps to dist-upgrade your BOSS GNU/Linux machine.
(Note:
* First backup all your (important)data, configuration files before proceeding the upgrade your machine.
* Ensure you have active internet connection throughout the following process.
* The process data consuming, it needs about 2.0 GB of data transfer)
Steps to do in current version with the current repository (in our case BOSS 5.0 anokha)
1. update the machine
$sudo apt-get update
2. upgrade the machine
$sudo apt-get upgrade
3. dist-upgrade the machine
$sudo apt-get dist-upgrade
The steps 2 & 3 must be finished successfully without any errors. If you end-up with errors first fix it, without you can't proceed. And importantly
check each time what are the packages going to be removed. If you find anything important shown as going to be removed, be ensure twice with double cautions is it ok to you and then proceed.
Steps to do in current version with the target repository (in our case BOSS 6.0 anoop)
1. Modify the "/etc/apt/sources.list" to point to the new version's repository. For our case open & edit the file "/etc/apt/sources.list" file as follows.
$sudo gedit /etc/apt/sources.list
existing:
deb http://packages.bosslinux.in/boss anokha main contrib non-free
deb-src http://packages.bosslinux.in/boss anokha main contrib non-free
After modification:
deb http://packages.bosslinux.in/boss anoop main contrib non-free
deb-src http://packages.bosslinux.in/boss anoop main contrib non-free
save and exit.
2. update the machine
$sudo apt-get update
3. Upgrade the machine
$sudo apt-get upgrade
4. Upgrade the machine
$sudo apt-get dist-upgrade
In the 3 & 4 th steps be in & around your machine, as the new versions of the packages installed it will prompt for configuration file changes. For example let's take "postgresql" configuration file. You may be modified it for your previous needs. As the newer version going to be installed you will be prompted with options to keep older configuration file, replace with new etc., give your option accordingly (default & recommended is keeping your old configuration file). Once you crossed all the said steps successfully, machine will prompt for "reboot", after which you could be landed into newer version of BOSS GNU/Linux.
How to check the upgraded version?
$hostnamectl
output will be something like
Static hostname: boss
Icon name: computer-desktop
Chassis: desktop
Machine ID: 62c6fd7923f0953d60
Boot ID: 5449ccd6794947cc8309fdff20546b0b
Operating System: BOSS GNU/Linux 6 (anoop)
Kernel: Linux 3.2.0-4-686-pae
Kernel Upgrade:
From the above output we are sure that the machine is i686 arch so we have to install the newer kernel of same architecture. So, we will find the newer/latest linux kernel available in our repository and install. First let us check the available linux kernels using
$apt-cache search linux-image - outputs something like follows
linux-image-3.16.0-4-586 - Linux 3.16 for older PCs
linux-image-3.16.0-4-686-pae - Linux 3.16 for modern PCs
linux-image-3.16.0-4-686-pae-dbg - Debugging symbols for Linux \ 3.16.0-4-686-pae
linux-image-3.16.0-4-amd64 - Linux 3.16 for 64-bit PCs
linux-image-486 - Linux for older PCs (dummy package)
linux-image-586 - Linux for older PCs (meta-package)
linux-image-686-pae - Linux for modern PCs (meta-package)
linux-image-686-pae-dbg - Debugging symbols for Linux 686-pae configuration (meta-package)
linux-image-amd64 - Linux for 64-bit PCs (meta-package)
linux-image-3.2.0-4-686-pae - Linux 3.2 for modern PCs
linux-headers-3.2.0-4-686-pae - Header files for Linux 3.2.0-4-686-pae
The existing kernle is linux-3.2 and we have linux-3.16 in our repository for i686 architecture. So, we could proceed with installation of new kernel
$sudo apt-get install linux-image-3.16.0-4-686-pae
Now, your machine will prompt you for rebooting. Before rebooting you may consider purging removed packages(optional but recommended).
Purging removed packages:
Purge = (In Linux) Complete removal of a package including configuration files. Many a time a package removed but its configuration files may stay with the machine. To remove those unnecessary configuration files we purging.
$ dpkg -l | awk '/^rc/ { print $2 }' - Lists all the removed packages
$sudo apt-get purge $(dpkg -l | awk '/^rc/ { print $2 }') - purge the removed packages.
1. I am completely adapted(/addicted) to BOSS 5.0, and pretty much comfortable with it. I don't want to lose my comfortableness.
2. I afraid to dist-upgrade, which many a time leads to -> at minimum inconsistency & at maximum machine crash.
So, what made me to upgrade my linux box?
It's been about 2 years since my last bug-fix to LibreOffice office suite. And that FOSS contribution itch starts now again. So, I decide to download & compile the source code LibreOffice in my Linux box. But, Unfortunately when I to do so I end up with the error
"libo/sal/qa/rtl/strings/test_oustring_stringliterals.cxx: In member function ‘void test::oustring::StringLiterals::checkOUStringLiteral1()"
libo/sal/qa/rtl/strings/test_oustring_stringliterals.cxx:195:48: internal compiler error: Segmentation fault
As the reason pointed out by the LibreOffice developers, I have to use gcc-4.8 or higher version to compile the LibreOffice source. But, It's not available with BOSS 5.0 (which derived from Debian release wheezy) and the same is with debian also (even backports also don't have gcc-4.8). This leads to only one solution i.e upgrading the machine.
Now, The steps to dist-upgrade your BOSS GNU/Linux machine.
(Note:
* First backup all your (important)data, configuration files before proceeding the upgrade your machine.
* Ensure you have active internet connection throughout the following process.
* The process data consuming, it needs about 2.0 GB of data transfer)
Steps to do in current version with the current repository (in our case BOSS 5.0 anokha)
1. update the machine
$sudo apt-get update
2. upgrade the machine
$sudo apt-get upgrade
3. dist-upgrade the machine
$sudo apt-get dist-upgrade
The steps 2 & 3 must be finished successfully without any errors. If you end-up with errors first fix it, without you can't proceed. And importantly
check each time what are the packages going to be removed. If you find anything important shown as going to be removed, be ensure twice with double cautions is it ok to you and then proceed.
Steps to do in current version with the target repository (in our case BOSS 6.0 anoop)
1. Modify the "/etc/apt/sources.list" to point to the new version's repository. For our case open & edit the file "/etc/apt/sources.list" file as follows.
$sudo gedit /etc/apt/sources.list
existing:
deb http://packages.bosslinux.in/boss anokha main contrib non-free
deb-src http://packages.bosslinux.in/boss anokha main contrib non-free
After modification:
deb http://packages.bosslinux.in/boss anoop main contrib non-free
deb-src http://packages.bosslinux.in/boss anoop main contrib non-free
save and exit.
2. update the machine
$sudo apt-get update
3. Upgrade the machine
$sudo apt-get upgrade
4. Upgrade the machine
$sudo apt-get dist-upgrade
In the 3 & 4 th steps be in & around your machine, as the new versions of the packages installed it will prompt for configuration file changes. For example let's take "postgresql" configuration file. You may be modified it for your previous needs. As the newer version going to be installed you will be prompted with options to keep older configuration file, replace with new etc., give your option accordingly (default & recommended is keeping your old configuration file). Once you crossed all the said steps successfully, machine will prompt for "reboot", after which you could be landed into newer version of BOSS GNU/Linux.
How to check the upgraded version?
$hostnamectl
output will be something like
Static hostname: boss
Icon name: computer-desktop
Chassis: desktop
Machine ID: 62c6fd7923f0953d60
Boot ID: 5449ccd6794947cc8309fdff20546b0b
Operating System: BOSS GNU/Linux 6 (anoop)
Kernel: Linux 3.2.0-4-686-pae
Kernel Upgrade:
From the above output we are sure that the machine is i686 arch so we have to install the newer kernel of same architecture. So, we will find the newer/latest linux kernel available in our repository and install. First let us check the available linux kernels using
$apt-cache search linux-image - outputs something like follows
linux-image-3.16.0-4-586 - Linux 3.16 for older PCs
linux-image-3.16.0-4-686-pae - Linux 3.16 for modern PCs
linux-image-3.16.0-4-686-pae-dbg - Debugging symbols for Linux \ 3.16.0-4-686-pae
linux-image-3.16.0-4-amd64 - Linux 3.16 for 64-bit PCs
linux-image-486 - Linux for older PCs (dummy package)
linux-image-586 - Linux for older PCs (meta-package)
linux-image-686-pae - Linux for modern PCs (meta-package)
linux-image-686-pae-dbg - Debugging symbols for Linux 686-pae configuration (meta-package)
linux-image-amd64 - Linux for 64-bit PCs (meta-package)
linux-image-3.2.0-4-686-pae - Linux 3.2 for modern PCs
linux-headers-3.2.0-4-686-pae - Header files for Linux 3.2.0-4-686-pae
The existing kernle is linux-3.2 and we have linux-3.16 in our repository for i686 architecture. So, we could proceed with installation of new kernel
$sudo apt-get install linux-image-3.16.0-4-686-pae
Now, your machine will prompt you for rebooting. Before rebooting you may consider purging removed packages(optional but recommended).
Purging removed packages:
Purge = (In Linux) Complete removal of a package including configuration files. Many a time a package removed but its configuration files may stay with the machine. To remove those unnecessary configuration files we purging.
$ dpkg -l | awk '/^rc/ { print $2 }' - Lists all the removed packages
$sudo apt-get purge $(dpkg -l | awk '/^rc/ { print $2 }') - purge the removed packages.
Wednesday, June 25, 2014
How to install Samsung SCX-4521-NS multifunction printer in Linux?
1.
Download the driver file for linux from the following url
2.
extract the downloaded file then open Applications → Terminal
Assume
that the downloaded file is in the directory ~/Downloads
3.
Issue the following commands as in the same order
$cd ~/Downloads/uld
$./ install.sh
give
proper values (mostly yes/no options) whenever prompted
4.
Once the driver got installed, connect your printer with the
PC/Laptop then do the following steps
5. Go
to Applications → System tools → Administration
→ Printing this will open printer configuration wizard. (Am Using a debian derived distro named BOSS GNU/Linux, in your destro the "Printing" may be available under different menu item, with different name)
6.
Click on Add button, give password whenever prompted. The
connected printer will be automatically detected and then click on
Forward button. Now a new popup window will open select the
option “provide ppd file”
7. Now
browse to the location of ppd file (which is
/usr/share/ppd/uld-samsung)
8. Now
select the ppd file with the exact name as
“Samsung_SCX-4650_4x21S_Series.ppd”
then
proceed.
Monday, May 26, 2014
How to add CD/DVD entry into Debian Linux source.list file
In Debian based linux(deb package management system) Linux "/etc/apt/sources.list" is the file which tells your linux box where the repository. Regardless of the new packages installation mode (whether via terminal with apt-get command or with synaptic package manager) this file is referenced to fetch the needed .deb files. For this method you need to have a good internet connection.
If you have installation CD/DVD you can add this to the source.list file and use that as your repository(only to install the packages available in the CD/DVD). how to do that?
[What apt tool actually needs is a catalog file to use (packages.gz) and the original .deb packages. As the installation CD/DVD contains it we can use the same as like online repo.]
1. Insert your CD/DVD into the drive and ensure it is mounted properly
2. Go to terminal by
Applications -> Accessories -> Terminal (Steps for BOSS GNU/Linux)
3. Type the following command
$sudo apt-cdrom add
This command will add the cdrom entry into the /etc/apt/sources.list.
4. Now update your apt file with the following command
$sudo apt-get update
5. Install the packages you need by
$sudo apt-get install
Friday, May 23, 2014
How to build a debian package from source?
1. download the source from the repository
$apt-get source Ex. $apt-get source scimsource
This command will fetch the source code of the package you specified in, which will contain .dsc, .orig.tar.gz, sometimes .diff.gz.
2. Apply changes/differences with the original source
[Assume that I downloaded the packages under ~/Download/scimsource.]
$cd ~/Download/scimsource
apply the diff (changes) to the orig source by
$dpkg-source -x.dsc
[For further details about unpacking debian source you can refer this crisp & simple howto.]
Now, the changes will be applied to the source.
3. Build/Compile the source to build installable deb package.
a) If you want to add some changes in the source code or add some features to the existing source code proceed with the extracted source & then update the Changelog* file accordingly.
b) If your aim is just to build the deb package from the source you need not to touch the Changelog file.
For building the source to deb package you need to
i). Build dependency
$sudo apt-get build-dep
This command will install the needed libraries, other packages that are
essential for compiling/building the source into deb.
ii). Build the source by,
$sudo dpkg-buildpackage -rfakeroot -us -uc -sa
Note: you must issue the above command provided that you are inside the package's source directory. (first do $cd ~/Download/scimsource/scim).
* -> changelog file will be available in the extracted source under "/debian/Changelog"
$apt-get source
This command will fetch the source code of the package you specified in
2. Apply changes/differences with the original source
[Assume that I downloaded the packages under ~/Download/scimsource.]
$cd ~/Download/scimsource
apply the diff (changes) to the orig source by
$dpkg-source -x
[For further details about unpacking debian source you can refer this crisp & simple howto.]
Now, the changes will be applied to the source.
3. Build/Compile the source to build installable deb package.
a) If you want to add some changes in the source code or add some features to the existing source code proceed with the extracted source & then update the Changelog* file accordingly.
b) If your aim is just to build the deb package from the source you need not to touch the Changelog file.
For building the source to deb package you need to
i). Build dependency
$sudo apt-get build-dep
This command will install the needed libraries, other packages that are
essential for compiling/building the source into deb.
ii). Build the source by,
$sudo dpkg-buildpackage -rfakeroot -us -uc -sa
Note: you must issue the above command provided that you are inside the package's source directory. (first do $cd ~/Download/scimsource/scim).
* -> changelog file will be available in the extracted source under "
Wednesday, May 21, 2014
Gpick - A Color picker for debian based GNU/Linux .
 | |
| Screenshot of gpicker |
I came across this awesome desktop applicaiton called "Gpick" home page of Gpick (Yes, for GNOME Desktop environment). Its just cool, I need not even to explain how to use this application, it as simple. Just install by
$sudo apt-get install gpick
and give a try.
Note: I am using BOSS GNU/Linux a indian version debian linux.
Tuesday, February 25, 2014
How to solve "Package gtk+-3.0 was not found" & "fatal error: gtk/gtk.h: No such file or directory" errors in Linux
As of now some of the Linux distros don't come up with the gtk-3.0 libraries and development files by default. Though Gnome application developers are asked to migrate to gtk3, most of the desktop applications are still in gtk2. Due to these reasons gtk3 development files are not pre bundled with distros. So, we have to install gtk3 development files, libraries manually to compile a gtk+-3.0 based GUI applications.
If your gtk3 program compilation ($gcc -o executable_name program_name `pkg-config --cflags --libs gtk+-3.0`) throws error something like this
Package gtk+-3.0 was not found
(or)
fatal error: gtk/gtk.h: No such file or directory
which means your machine is not installed with the gtk3 development files.
To install the package in debian based machines
$sudo apt-get install libgtk-3-dev
To install in rpm based machines
$yum install gtk3-devel
After the successful installation your machine should return output something like following while you execute the command
"sudo pkg-config --cflags --libs gtk+-3.0"
"-pthread -I/usr/include/gtk-3.0 -I/usr/include/pango-1.0 -I/usr/include/gio-unix-2.0/ -I/usr/include/atk-1.0 -I/usr/include/cairo -I/usr/include/gdk-pixbuf-2.0 -I/usr/include/freetype2 -I/usr/include/glib-2.0 -I/usr/lib/i386-linux-gnu/glib-2.0/include -I/usr/include/pixman-1 -I/usr/include/libpng12 -lgtk-3 -lgdk-3 -latk-1.0 -lgio-2.0 -lpangocairo-1.0 -lgdk_pixbuf-2.0 -lcairo-gobject -lpango-1.0 -lcairo -lgobject-2.0 -lglib-2.0
"
Now, you can compile your gtk3 programs happily... :)
Tuesday, August 20, 2013
Multimedia keys not working with VLC media player, How to map/bind these keys with VLC in BOSS GNU/Linux (a debian based distro)?
Nowadays many of keyboards comes with multimedia keys like play/pause, next & previous button, volume
up, down etc... Almost all the linux media players like totem movie player, banshee so and so are fully compatible with these multimedia keys. But, sadly most of us's favorite player VLC not supports :(.
There are two ways to make your vlc player to respond to your multimedia keys.
Method 1:
In linux, there are two sets of hotkeys (aka shortcuts)
i) Application specific hotkeys - Applicable/work only with the specific application
ii) Global hotkeys - Common to bunch of applications say multimedia applications, internet application.
Steps:
a) First remove the multimedia keys from global settings.
Applications
\-> System tools
\-> Preference
\-> system settings ------>>
 -> keyboard
\-> shortcuts tab
\-> Sound and Media
|
<<---------
Now click on the multimedia keys like Play/Pause, Next, Previous then back space to disable these global hot keys.
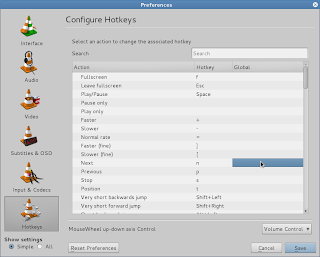
b) Second set these multimedia hot keys in VLC media player hot key preference.
VLC -> Tools -> Preferences ->
\-> hot keys ---->
Now double click on the Play/Pause, Next, Previous global part and the it will prompt for the hot key to that action. press the corresponding multimedia key to set.
Now restart the vlc, thats all your multimedia keys will start work with VLC media player.
up, down etc... Almost all the linux media players like totem movie player, banshee so and so are fully compatible with these multimedia keys. But, sadly most of us's favorite player VLC not supports :(.
There are two ways to make your vlc player to respond to your multimedia keys.
Method 1:
In linux, there are two sets of hotkeys (aka shortcuts)
i) Application specific hotkeys - Applicable/work only with the specific application
ii) Global hotkeys - Common to bunch of applications say multimedia applications, internet application.
Steps:
a) First remove the multimedia keys from global settings.

Applications
\-> System tools
\-> Preference
\-> system settings ------>>

\-> shortcuts tab
\-> Sound and Media
|
<<---------
Now click on the multimedia keys like Play/Pause, Next, Previous then back space to disable these global hot keys.

b) Second set these multimedia hot keys in VLC media player hot key preference.
VLC -> Tools -> Preferences ->
\-> hot keys ---->
Now double click on the Play/Pause, Next, Previous global part and the it will prompt for the hot key to that action. press the corresponding multimedia key to set.
Now restart the vlc, thats all your multimedia keys will start work with VLC media player.
Note: As we removed the multimedia hotkeys from the global keyboard settings, after this the same keys only work with VLC but not with other multimedia applications like banshee, totem etc.
Method 2:
Install the packages named hotkeys from your repository and restart the linux box.$sudo apt-get install hotkeys
$sudo init 6
Note: I am using BOSS GNU/Linux which is a debian based destro specially made for Indian Environment. The steps specified in the first method is specific to BOSS GNU/Linux. The keyboard setting of your distribution might be some where else.
Monday, July 15, 2013
How to remove libreoffice configuration/settings in debian based linux to fix the settings change problems?
Some times we do accidentally change the some settings of the libreoffice and endup with
1. weird/awakward views of our documents
2. problems in exporting our documents from one format to another say .odt to .doc
3. Alignment issues etc.,
So, If you don't know how to revert the settings/configuration you changed, or forget what changes you made.. there is one simple way to revert to the default settings. i.e removing the configuration data of that particular user to libreoffice.
One can find this libreoffice configuration/settings file at the following path in debian based linux like ubuntu, BOSS GNU/Linux etc.
/home//.config/libreoffice/ <-- b="">Inside this you have directory named user. Just remove(or cut & paste to some other place) this directory and launch the Libreoffice application again.
Note:
.config is hidden file so you first enable your file browser to see the hidden files by the short cut CTRL+h.
1. weird/awakward views of our documents
2. problems in exporting our documents from one format to another say .odt to .doc
3. Alignment issues etc.,
So, If you don't know how to revert the settings/configuration you changed, or forget what changes you made.. there is one simple way to revert to the default settings. i.e removing the configuration data of that particular user to libreoffice.
One can find this libreoffice configuration/settings file at the following path in debian based linux like ubuntu, BOSS GNU/Linux etc.
/home/
Note:
.config is hidden file so you first enable your file browser to see the hidden files by the short cut CTRL+h.
Wednesday, March 13, 2013
How to type copyright symbol, trademark symbol etc in linux?
As our qwerty keyboard can't accommodate all the available characters, symbols we end up with the keyboard(layout) that have the main and most widely used symbols, characters(with shift, alt key combinations). But, in my opinion our keyboard should at least add symbols like Copyright ©, Registered ®, Trademark symbol ™.
But, it is not possible to go every time into those application or to search with google to get/input these symbols. So, Here is a easy way to input these symbols with your standard English keyboard layout (qwerty layout). You have to enable some already available keyboard settings(Compose key) but not enabled by default .
So, with the help of compose key we can achieve this in our standard key board itself.
Compose key: A excerpt from wikipedia
"A compose key, available on some computer keyboards, is a special kind of modifier key designated to signal the software to interpret the following (usually two) keystrokes as a combination in order to produce a character not found directly on the keyboard. For example, striking Compose followed by ~ and then n can produce character ñ, whereas striking Compose followed by O and then C can produce the symbol ©, the copyright symbol). "
How to enable
1. In BOSS linux(or any linux which have menu like Applications, System)
System -> preferences -> keyboard settings -> Layout settings -> options -> Compose key positions
In Ubuntu
Settings -> Keyboard -> Layout settings -> Options -> Compose key positions
2. Select your desired compose key.
You can select any listed key(ctrl, win, capslock etc) as your compose key. But, as we are using Linux, It is recommended to use the win(dows) key as compose key.
Note: This is for the debian based linux machines(like Ubuntu, BOSS Linux etc) which employs gnome desktop environment. If your machine is not a debian based one or it uses other desktop environment systems(like kde, xfce etc), you have to fine where the keyboard setting is available and need to enable the settings as above.
Usually we do get/input these symbols from:
1. From a text editor program or from office suite(from insert symbols) like libreoffice, MS office etc.
2. From internet web pages by searching terms like "copyright symbol", "Trade mark symbol"
So, with the help of compose key we can achieve this in our standard key board itself.
Compose key: A excerpt from wikipedia
"A compose key, available on some computer keyboards, is a special kind of modifier key designated to signal the software to interpret the following (usually two) keystrokes as a combination in order to produce a character not found directly on the keyboard. For example, striking Compose followed by ~ and then n can produce character ñ, whereas striking Compose followed by O and then C can produce the symbol ©, the copyright symbol). "
How to enable
1. In BOSS linux(or any linux which have menu like Applications, System)
System -> preferences -> keyboard settings -> Layout settings -> options -> Compose key positions
In Ubuntu
Settings -> Keyboard -> Layout settings -> Options -> Compose key positions
2. Select your desired compose key.
You can select any listed key(ctrl, win, capslock etc) as your compose key. But, as we are using Linux, It is recommended to use the win(dows) key as compose key.
3. Save the settings thats all you are done.
There are many symbols and the key combinations to produce it. I here list few most often used symbols and its compose key combinations. I assume win(dows) key as the compose key.
| Symbol Name | Symbol | composekey combination |
|---|---|---|
| Copyright | © | win+o then c |
| Trademark | ™ | win+t then m |
| Registered symbol | ® | win+o then r |
| Quarter | ¼ | Win+1 then 4 |
| Half | ½ | Win+1 then 2 |
| 3 quarters | ¾ | Win+3 then 4 |
| Euro | € | win+e then = |
| Yen | ¥ | win+y then = |
| Pound | £ | win+l then - |
| cent | ¢ | win+c then | |
| degree | ° | win+o then o |
Note: This is for the debian based linux machines(like Ubuntu, BOSS Linux etc) which employs gnome desktop environment. If your machine is not a debian based one or it uses other desktop environment systems(like kde, xfce etc), you have to fine where the keyboard setting is available and need to enable the settings as above.
Thursday, November 1, 2012
how to view all the uninstalled packages in a debian based linux?
dpkg - > is a debian package manager command
dpkg -l - > will list all the packages with their status installed/deinstalled/removed/half-installed etc
The first 2(actually 3) letters of the output of " dpkg -l " command are significant to us, because it tells the current state of the package. if it is
ii - installed
rc - removed but configuration files are kept
So, " $dpkg -l | grep ^rc "
will display all the package that are removed but configuration files are still kept.
Note: if you purged configuration files of a package during removal using
"apt-get remove --purge < package_name >" then those packages will not be displayed.
For more information about dpkg :
i) man dpkg
ii) dpkg -l - > Read the first 4 lines ;-)
iii) Read this http://linuxprograms.wordpress.com/2010/05/11/status-dpkg-list/
dpkg -l - > will list all the packages with their status installed/deinstalled/removed/half-installed etc
The first 2(actually 3) letters of the output of " dpkg -l " command are significant to us, because it tells the current state of the package. if it is
ii - installed
rc - removed but configuration files are kept
So, " $dpkg -l | grep ^rc "
will display all the package that are removed but configuration files are still kept.
Note: if you purged configuration files of a package during removal using
"apt-get remove --purge < package_name >" then those packages will not be displayed.
For more information about dpkg :
i) man dpkg
ii) dpkg -l
iii) Read this http://linuxprograms.wordpress.com/2010/05/11/status-dpkg-list/
Thursday, October 25, 2012
How to install a specific version of a debian package?
Some times the debian package version which is installed in your linux box (say foo-package-x.y.xy ) is different from what version you really want(say foo-package-y.x.yx). Assume that both the versions are available in the repository. So, how we install the exact version we needed..? Here comes the solution, from terminal issue the following command,
$sudo apt-get install foo-package=y.x.yx
Replace the foo-package with your packagename, y.x.yx with the version (name)number you need. Now, the package with the given version will be installed.
If you want to see all the available versions of particular debian package in the repository.. do the following,
$sudo apt-get update
The above command updates the package index of your machine with the repository.
$sudo apt-cache show <package-name>
The above command shows the details of package, where we find version details also.
Want to install linux debian packages without internet connection..? check this out
Thursday, October 18, 2012
How to install/configure skype in debian based linux?
skype:
is a VoIP based software application which is mainly used for peer to peer phone/video call, instant messaging over internet connection in free of cost*. To use this one should have a valid user account with skype. Now, skype have features like file transfer, video conferencing also.free of cost* - Only between skype accounts, yes you can call/sms any landline/mobile phone... but with applicable call charges :(.
1. Download the latest linux version of skype from here. Select your exact distribution like debian, Opensuse, ubuntu etc..
2. Install the downloaded package using your package manager. I am using BOSS GNU/Linux 4.0 and it is a debian based one. So, the following steps regarding installation is applicable to only to the debian based linux distributions like ubuntu, BOSS GNU/Linux, linuxmint, knoppix etc.
GUI way:
Right click the downloaded skype-xy-z.deb package -> Open with gdebi package installer -> Install
Command line way:
$dpkg -i fullpath-to-downloaded-directory/skype-xy-z.deb
Once installed, as per your distribution's application classification skype menu will be placed either below internet or sound & video. In BOSS GNU/Linux it will be placed under Internet.
3. If you have skype user account already then just use it. If not create your user account by "Do not have user account.? create " link from the Skype GUI application.
GUI -> Graphical User Interface
BOSS -> Bharat Operating system solutions
GNU -> GNU's Not Unix
VoIP - Voice over IP(Internet Protocal)
Sunday, March 4, 2012
How to lock a linux user from logging into a machine?
In some scenarios its needed to lock a user to login into his own account. This can be achieved by many ways.

1. GUI way
1.1 Go to System -> Administration -> Users and Groups
1.2 Now select the particular user from the left side, then click on the advanced settings button

1.3 Click on the Advanced tab then tick the check box with value "Disable Account"
1.4 To revoke follow the 1.1 & 1.2 now you can see a "Enable account" button click and enable
2. Terminal way
1. As a root user issue the following command in the terminal
$sudo passwd -l "username of the user to lock"
Thursday, January 5, 2012
How to install/use fedora 16 (verne) in Debian based linux using virutal box?
This blog post explains you how to install fedora16 (verne) in virtualbox. Even though i do explain the things in terms of BOSS GNU/Linux 4.0(Linux distro which am using), it is applicable to all the debian based linux distros like ubuntu etc..
1. Download the fedora linux iso CD image of installable live media from here you will get fedora-16-i686-Live-Desktop.iso file.
2. Install virtualbox-ose from your repository using the following command in terminal
$sudo apt-get install virtualbox-ose
3. After the installation of the virtualbox the menu entry is added in Applications -> System Tools -> Virtual box click that menu entry
4. In Virtualbox click on new -> Next -> Give a name & select os type(say Fedora16, OS -Linux, fedora) -> Next -> Base memory 800 MB -> Next -> Next -> Next -> Next -> 8.0 GB Hard disk size

5. Now Click on Fedora16 (for the first time) will show a small gui that asks you for the input OS either from CD/iso image of the OS. Search for the place where your fedora16-i686-Live-Desktop.iso file and select it.
6. Soon the OS will be booted. Thats all but now remember now you are in live mode only. So, if you want install the live OS into the hard drive directly. Now click on System tools -> Install/copy to harddrive
7. Give all the options for installation like keyboard layout, country, time & partition details etc.
8. Thats all :)
Thursday, December 22, 2011
How to generate package download script using synaptic?
This post describes how to install linux (.deb)packages into a linux machine which have no/low speed internet connection[In linux one should have a good internet connection to get connected to repository to install any new packages]. Ofcourse this will be achieved only through a another linux machine(of same distro&same version unless you know how to modify /etc/apt/sources.list and update the linux machine) that has good internet connection like your Relative's/friend's machine or a linux box in browsing center etc. I am explaining the following thing with BOSS GNU/Linux 4.0(savir version name).
We can achieve the installation of a package into a machine with low/no internet connection
Method 1:
1. The machine in which you want to install go System -> Adminstration -> Synaptic Package Manager
2. Select the package which you want to install.
Note: Synaptic itself selects all the other dependency packages that are needed to install the package you selected. You can see a green color tick mark, those packages are going to be installed
3. Now click on File -> Generate Download script, give a file name for the script and select path to save it.

4. Keep the resultant file with you & execute that shell script file in a machine which have the internet connection, it will downloads all the packages(.deb files) that are needed to install the packages you selected.
5. Copy all those files to your linux machine and install through terminal as follows
$cd /path_to/deb_files/directory
$sudo dpkg -i *.deb
6. Now the packages is installed successfully thats all.
Method 2:
Another way, is install the package which have a good internet connection and copy the .deb files downloaded for that installation, use it in your system
1. First clean the archives directory
$sudo apt-get clean
2. Install the package which you want using
$sudo apt-get install <package_name>
3. copy all the .deb files from the /var/cache/apt/archives directory to your removable media(pendrive)
$mkdir /media/<your_perndrive_moutn_point>/deb_directory
$sudo cp /var/cache/apt/archives/*.deb /media/<your_perndrive_moutn_point>/deb_directory
4. Insert the pendrive in your machine and do the following
$cd /media/your_pendrive_mount_point/deb_directory
$sudo dpkg -i *.deb
Thats all the packages are installed in your machine... This two methods are useful when you try to install huge packages like office, gimp, blender etc...
any how Methode 1 is best one as it creates the script to download the .deb packages that actually is needed to install into your machine, and it doesn't install only downloads.
Monday, December 19, 2011
How to create a simple local apt repository?
This post is regarding debian based distros which supports .deb, so the procedures are not applicable for distros that uses .rpm like fedora, redhat etc..
Requirements:
build-essential
dpkg-scanpackages
gzip
How to do:
1. Create a directory named "repo" in your home directory. say $mkdir /home/test/repo
2. Copy all the debs you have into the /home/test/repo
3. Open your terminal as root and do the following & change directory to /home/test/repo
#mkdir /home/test/repo
#cd /home/test/repo
#dpkg-scanpackages . /dev/null | gzip -9c > ./Packages.gz
Here, '.' specifies -> present working directory
/dev/null specifies -> override file, as we not going to use override file we give /dev/null
gzip -9c>./Packages.gz -> Compresses the package details into the file Packages.gz
(Packages.gz will be created within the present working directory)
4. add the following line in your /etc/apt/sources.list file
deb file:/home/test/repo/ /
5. Update your system using apt-get update command
#apt-get update
6. Thats all now your /var/lib/apt/lists will be updated
Note: Remember now whenever you use "apt-cache search" "apt-get install" it only installs from debs inside /home/test/repo.
Subscribe to:
Posts (Atom)