Add the following lines to the /etc/apache2/sites-enabled/000-default.conf file in side <VirtualHost *:80> </VirtualHost> block (In debian based linux)
RewriteEngine On
RewriteCond %{HTTPS} !on
RewriteRule (.*) https://%{HTTP_HOST}%{REQUEST_URI}
Showing posts with label linux. Show all posts
Showing posts with label linux. Show all posts
Friday, November 12, 2021
How to redirect http requests to https?
Tuesday, March 12, 2019
How to make Brother HL 2040 printer working under Linux?
Go to this link -> https://www.openprinting.org/printer/Brother/Brother-HL-2040
Click on the link "directly download PPD" which is underlined in green colour
 |
| PPD for Brother-HL-2040 |
Now in your linux machine (Debian based)
goto printer settings -> Select the "provide PPD" option -> Browse to the downloaded PPD file and "apply"
Check with the test print.
Wednesday, May 3, 2017
How to create printable version of a man page..?
Most of us are always feel boring to read man pages in terminal window. what if we have a printable version of a particular command's manpage.? Nice isn't it.. so, how we can create a printable version of a manpage...
Step 1: Issue the following command in terminal
$man -t > destination_file_path.ps
Ex:$man -t mkdir > ~/Desktop/mkdir_manpage_printableversion.ps
Now you got a file named " mkdir_manpage_printableversion.ps " in your Desktop :). you can now print and use it..
Note: .ps(Postscript) is the default file type used to print. It can be opened with any PDF viewer and can be printed.
Step 1: Issue the following command in terminal
$man -t
Ex:$man -t mkdir > ~/Desktop/mkdir_manpage_printableversion.ps
Now you got a file named " mkdir_manpage_printableversion.ps " in your Desktop :). you can now print and use it..
Note: .ps(Postscript) is the default file type used to print. It can be opened with any PDF viewer and can be printed.
Monday, January 9, 2017
How to resolve "no suitable module for running kernel found" error in virtualbox instalation in debian linux?
1. Check wheather you machine is installed with
"linux-headers-,
linux-image-"
by issueing the follwing command in terminal.
$dpkg -l | grep linux
In my case my kernel version is "3.16.0-4-686-pae" so the output of the above command would be something like as follows,
If you don't find any linux-headers or linux-images then you must install them first.
2. To find the your kernel version use the following command
$uname -a
[ My output -> Linux hostname 3.16.0-4-686-pae #1 SMP Debian 3.16.36-1+deb8u2 (2016-10-19) i686 GNU/Linux ]
now install the required packages specified in step 1.
3. Uninstall your previous virutalbox package and reinstall it.
$sudo apt-get remove --purge virtualbox
$sudo apt-get instlal virtualbox
4. Restart you machine.
by issueing the follwing command in terminal.
$dpkg -l | grep linux
In my case my kernel version is "3.16.0-4-686-pae" so the output of the above command would be something like as follows,
 | |||||||
| Missing linux headers package |
If you don't find any linux-headers or linux-images then you must install them first.
2. To find the your kernel version use the following command
$uname -a
[ My output -> Linux hostname 3.16.0-4-686-pae #1 SMP Debian 3.16.36-1+deb8u2 (2016-10-19) i686 GNU/Linux ]
now install the required packages specified in step 1.
3. Uninstall your previous virutalbox package and reinstall it.
$sudo apt-get remove --purge virtualbox
$sudo apt-get instlal virtualbox
4. Restart you machine.
Thursday, May 7, 2015
How to block websites and show warning page in local machine using webserver?
This post specific to Debian based linux
3 main steps:
1. Add website entries in the /etc/hosts file
2. Setup a webserver in local machine
3. Create files to serve using web server.
#Local Machine
127.0.0.1 localhost
127.0.1.1
# The following lines are desirable for IPv6 capable hosts
::1 localhost ip6-localhost ip6-loopback
ff02::1 ip6-allnodes
ff02::2 ip6-allrouters
add your new entries (websites to be blocked) at the bottom of the file like
127.0.0.1 twitter.com
127.0.0.1 yahoo.com
127.0.0.1 facebook.com
...
...
save and exit.
Any webserver can be used for the very purpose which ranges apache, Thin, twiggy, yaws, wbox, webfs, mini-httpd, lighttpd etc., As we are going to serve only one static webpage, It would be better if we use a very minimal, low foot print server.
I found micro-httpd a optimum one for the purpose. Now, do the following steps in terminal.
#touch /etc/inetd.conf
#sudo apt-get install micro-httpd inetutils-inetd
By default the service directory for the micro-httpd server is "/var/www". But, if you want to change it, you can do so in the file "/etc/inetd.conf".
Content of a sample warning page.
<html>
<head> <title> Warning page! </title> </head>
<body bgcolor="black">
<div align="center" style="color: red; margin-top: 25%;">
<b><h2>
Very Sorry!The website you are trying to acces is blocked </h2>
</b> </div>
</body>
</html>
copy paste the above content in a file and save it with the name "index.html" under "/var/www/" directory. Now, reboot your machine then try to access the blocked websites via browser. Now, you can access all the websites for blocked one your browser will show the warning page.
3 main steps:
1. Add website entries in the /etc/hosts file
2. Setup a webserver in local machine
3. Create files to serve using web server.
1. Add website entries in /etc/hosts file
Open /etc/hosts file in an editor (as a super user, for normal users the file will open only in readonly mode.). The typical content of the file will looks like#Local Machine
127.0.0.1 localhost
127.0.1.1
# The following lines are desirable for IPv6 capable hosts
::1 localhost ip6-localhost ip6-loopback
ff02::1 ip6-allnodes
ff02::2 ip6-allrouters
add your new entries (websites to be blocked) at the bottom of the file like
127.0.0.1 twitter.com
127.0.0.1 yahoo.com
127.0.0.1 facebook.com
...
...
save and exit.
2. Setup a webserver in local machine.
Any webserver can be used for the very purpose which ranges apache, Thin, twiggy, yaws, wbox, webfs, mini-httpd, lighttpd etc., As we are going to serve only one static webpage, It would be better if we use a very minimal, low foot print server.
I found micro-httpd a optimum one for the purpose. Now, do the following steps in terminal.
#touch /etc/inetd.conf
#sudo apt-get install micro-httpd inetutils-inetd
By default the service directory for the micro-httpd server is "/var/www". But, if you want to change it, you can do so in the file "/etc/inetd.conf".
3. Create files to serve using web-server
Content of a sample warning page.
<html>
<head> <title> Warning page! </title> </head>
<body bgcolor="black">
<div align="center" style="color: red; margin-top: 25%;">
<b><h2>
Very Sorry!The website you are trying to acces is blocked </h2>
</b> </div>
</body>
</html>
copy paste the above content in a file and save it with the name "index.html" under "/var/www/" directory. Now, reboot your machine then try to access the blocked websites via browser. Now, you can access all the websites for blocked one your browser will show the warning page.
Thursday, December 12, 2013

Tuesday, August 20, 2013
Multimedia keys not working with VLC media player, How to map/bind these keys with VLC in BOSS GNU/Linux (a debian based distro)?
Nowadays many of keyboards comes with multimedia keys like play/pause, next & previous button, volume
up, down etc... Almost all the linux media players like totem movie player, banshee so and so are fully compatible with these multimedia keys. But, sadly most of us's favorite player VLC not supports :(.
There are two ways to make your vlc player to respond to your multimedia keys.
Method 1:
In linux, there are two sets of hotkeys (aka shortcuts)
i) Application specific hotkeys - Applicable/work only with the specific application
ii) Global hotkeys - Common to bunch of applications say multimedia applications, internet application.
Steps:
a) First remove the multimedia keys from global settings.
Applications
\-> System tools
\-> Preference
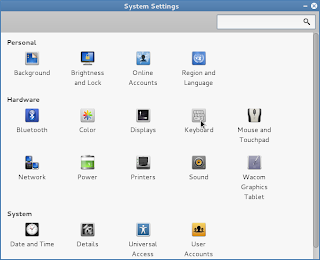
\-> system settings ------>>
 -> keyboard
\-> shortcuts tab
\-> Sound and Media
|
<<---------
Now click on the multimedia keys like Play/Pause, Next, Previous then back space to disable these global hot keys.
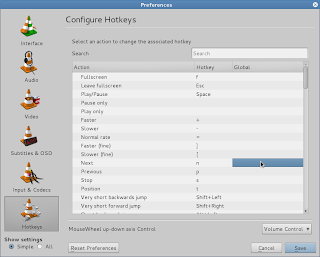
b) Second set these multimedia hot keys in VLC media player hot key preference.
VLC -> Tools -> Preferences ->
\-> hot keys ---->
Now double click on the Play/Pause, Next, Previous global part and the it will prompt for the hot key to that action. press the corresponding multimedia key to set.
Now restart the vlc, thats all your multimedia keys will start work with VLC media player.
up, down etc... Almost all the linux media players like totem movie player, banshee so and so are fully compatible with these multimedia keys. But, sadly most of us's favorite player VLC not supports :(.
There are two ways to make your vlc player to respond to your multimedia keys.
Method 1:
In linux, there are two sets of hotkeys (aka shortcuts)
i) Application specific hotkeys - Applicable/work only with the specific application
ii) Global hotkeys - Common to bunch of applications say multimedia applications, internet application.
Steps:
a) First remove the multimedia keys from global settings.

Applications
\-> System tools
\-> Preference
\-> system settings ------>>

\-> shortcuts tab
\-> Sound and Media
|
<<---------
Now click on the multimedia keys like Play/Pause, Next, Previous then back space to disable these global hot keys.

b) Second set these multimedia hot keys in VLC media player hot key preference.
VLC -> Tools -> Preferences ->
\-> hot keys ---->
Now double click on the Play/Pause, Next, Previous global part and the it will prompt for the hot key to that action. press the corresponding multimedia key to set.
Now restart the vlc, thats all your multimedia keys will start work with VLC media player.
Note: As we removed the multimedia hotkeys from the global keyboard settings, after this the same keys only work with VLC but not with other multimedia applications like banshee, totem etc.
Method 2:
Install the packages named hotkeys from your repository and restart the linux box.$sudo apt-get install hotkeys
$sudo init 6
Note: I am using BOSS GNU/Linux which is a debian based destro specially made for Indian Environment. The steps specified in the first method is specific to BOSS GNU/Linux. The keyboard setting of your distribution might be some where else.
Wednesday, March 13, 2013
How to type copyright symbol, trademark symbol etc in linux?
As our qwerty keyboard can't accommodate all the available characters, symbols we end up with the keyboard(layout) that have the main and most widely used symbols, characters(with shift, alt key combinations). But, in my opinion our keyboard should at least add symbols like Copyright ©, Registered ®, Trademark symbol ™.
But, it is not possible to go every time into those application or to search with google to get/input these symbols. So, Here is a easy way to input these symbols with your standard English keyboard layout (qwerty layout). You have to enable some already available keyboard settings(Compose key) but not enabled by default .
So, with the help of compose key we can achieve this in our standard key board itself.
Compose key: A excerpt from wikipedia
"A compose key, available on some computer keyboards, is a special kind of modifier key designated to signal the software to interpret the following (usually two) keystrokes as a combination in order to produce a character not found directly on the keyboard. For example, striking Compose followed by ~ and then n can produce character ñ, whereas striking Compose followed by O and then C can produce the symbol ©, the copyright symbol). "
How to enable
1. In BOSS linux(or any linux which have menu like Applications, System)
System -> preferences -> keyboard settings -> Layout settings -> options -> Compose key positions
In Ubuntu
Settings -> Keyboard -> Layout settings -> Options -> Compose key positions
2. Select your desired compose key.
You can select any listed key(ctrl, win, capslock etc) as your compose key. But, as we are using Linux, It is recommended to use the win(dows) key as compose key.
Note: This is for the debian based linux machines(like Ubuntu, BOSS Linux etc) which employs gnome desktop environment. If your machine is not a debian based one or it uses other desktop environment systems(like kde, xfce etc), you have to fine where the keyboard setting is available and need to enable the settings as above.
Usually we do get/input these symbols from:
1. From a text editor program or from office suite(from insert symbols) like libreoffice, MS office etc.
2. From internet web pages by searching terms like "copyright symbol", "Trade mark symbol"
So, with the help of compose key we can achieve this in our standard key board itself.
Compose key: A excerpt from wikipedia
"A compose key, available on some computer keyboards, is a special kind of modifier key designated to signal the software to interpret the following (usually two) keystrokes as a combination in order to produce a character not found directly on the keyboard. For example, striking Compose followed by ~ and then n can produce character ñ, whereas striking Compose followed by O and then C can produce the symbol ©, the copyright symbol). "
How to enable
1. In BOSS linux(or any linux which have menu like Applications, System)
System -> preferences -> keyboard settings -> Layout settings -> options -> Compose key positions
In Ubuntu
Settings -> Keyboard -> Layout settings -> Options -> Compose key positions
2. Select your desired compose key.
You can select any listed key(ctrl, win, capslock etc) as your compose key. But, as we are using Linux, It is recommended to use the win(dows) key as compose key.
3. Save the settings thats all you are done.
There are many symbols and the key combinations to produce it. I here list few most often used symbols and its compose key combinations. I assume win(dows) key as the compose key.
| Symbol Name | Symbol | composekey combination |
|---|---|---|
| Copyright | © | win+o then c |
| Trademark | ™ | win+t then m |
| Registered symbol | ® | win+o then r |
| Quarter | ¼ | Win+1 then 4 |
| Half | ½ | Win+1 then 2 |
| 3 quarters | ¾ | Win+3 then 4 |
| Euro | € | win+e then = |
| Yen | ¥ | win+y then = |
| Pound | £ | win+l then - |
| cent | ¢ | win+c then | |
| degree | ° | win+o then o |
Note: This is for the debian based linux machines(like Ubuntu, BOSS Linux etc) which employs gnome desktop environment. If your machine is not a debian based one or it uses other desktop environment systems(like kde, xfce etc), you have to fine where the keyboard setting is available and need to enable the settings as above.
Sunday, March 3, 2013
How to create a Linux repository for the intranet/local machines?
1. Copy the whole repository of a particular linux distro(BOSS Gnu/linux, ubunutu) into a harddisk(external/internal), either by debmirror command or request/contact to the repository maintainers.
1.1 Copy the repository using debmirror
$debmirror -a -d -s --method= -h --root= --no-source --progress --ignore-release-gpg
switch a - architecture, d - distro etc..
ex:
$debmirror -a i386 -d savir -s main,main/debian-installer --method=http -h packages.bosslinux.in --root=boss --no-source --progress --ignore-release-gpg /home/test/repository
2. install apache2 web server using
$sudo apt-get install apache2
3. Either copy the whole content distro copy "/home/test/repository" to "/var//www" directory, or give a link to /home/test/repository in /var/www
4. find the ip address of the machine(where you do all the above procedures. i.e machine in which you keep the local/intranet repository/server) using
$sudo ifconfig
5. add the following line as first entry in the /etc/apt/sources.list file of all the linux machines that connected to the intranet as follows
deb http:///boss savir main contrib non-free
6. Try apt-get update from the client machines if it updates fine, everything is fine. Your local intranet repository is setup successfully.
1.1 Copy the repository using debmirror
$debmirror -a
ex:
$debmirror -a i386 -d savir -s main,main/debian-installer --method=http -h packages.bosslinux.in --root=boss --no-source --progress --ignore-release-gpg /home/test/repository
2. install apache2 web server using
$sudo apt-get install apache2
3. Either copy the whole content distro copy "/home/test/repository" to "/var//www" directory, or give a link to /home/test/repository in /var/www
4. find the ip address of the machine(where you do all the above procedures. i.e machine in which you keep the local/intranet repository/server) using
$sudo ifconfig
5. add the following line as first entry in the /etc/apt/sources.list file of all the linux machines that connected to the intranet as follows
deb http://
6. Try apt-get update from the client machines if it updates fine, everything is fine. Your local intranet repository is setup successfully.
Thursday, November 1, 2012
how to view all the uninstalled packages in a debian based linux?
dpkg - > is a debian package manager command
dpkg -l - > will list all the packages with their status installed/deinstalled/removed/half-installed etc
The first 2(actually 3) letters of the output of " dpkg -l " command are significant to us, because it tells the current state of the package. if it is
ii - installed
rc - removed but configuration files are kept
So, " $dpkg -l | grep ^rc "
will display all the package that are removed but configuration files are still kept.
Note: if you purged configuration files of a package during removal using
"apt-get remove --purge < package_name >" then those packages will not be displayed.
For more information about dpkg :
i) man dpkg
ii) dpkg -l - > Read the first 4 lines ;-)
iii) Read this http://linuxprograms.wordpress.com/2010/05/11/status-dpkg-list/
dpkg -l - > will list all the packages with their status installed/deinstalled/removed/half-installed etc
The first 2(actually 3) letters of the output of " dpkg -l " command are significant to us, because it tells the current state of the package. if it is
ii - installed
rc - removed but configuration files are kept
So, " $dpkg -l | grep ^rc "
will display all the package that are removed but configuration files are still kept.
Note: if you purged configuration files of a package during removal using
"apt-get remove --purge < package_name >" then those packages will not be displayed.
For more information about dpkg :
i) man dpkg
ii) dpkg -l
iii) Read this http://linuxprograms.wordpress.com/2010/05/11/status-dpkg-list/
Thursday, October 18, 2012
How to install/configure skype in debian based linux?
skype:
is a VoIP based software application which is mainly used for peer to peer phone/video call, instant messaging over internet connection in free of cost*. To use this one should have a valid user account with skype. Now, skype have features like file transfer, video conferencing also.free of cost* - Only between skype accounts, yes you can call/sms any landline/mobile phone... but with applicable call charges :(.
1. Download the latest linux version of skype from here. Select your exact distribution like debian, Opensuse, ubuntu etc..
2. Install the downloaded package using your package manager. I am using BOSS GNU/Linux 4.0 and it is a debian based one. So, the following steps regarding installation is applicable to only to the debian based linux distributions like ubuntu, BOSS GNU/Linux, linuxmint, knoppix etc.
GUI way:
Right click the downloaded skype-xy-z.deb package -> Open with gdebi package installer -> Install
Command line way:
$dpkg -i fullpath-to-downloaded-directory/skype-xy-z.deb
Once installed, as per your distribution's application classification skype menu will be placed either below internet or sound & video. In BOSS GNU/Linux it will be placed under Internet.
3. If you have skype user account already then just use it. If not create your user account by "Do not have user account.? create " link from the Skype GUI application.
GUI -> Graphical User Interface
BOSS -> Bharat Operating system solutions
GNU -> GNU's Not Unix
VoIP - Voice over IP(Internet Protocal)
Sunday, March 4, 2012
How to lock a linux user from logging into a machine?
In some scenarios its needed to lock a user to login into his own account. This can be achieved by many ways.

1. GUI way
1.1 Go to System -> Administration -> Users and Groups
1.2 Now select the particular user from the left side, then click on the advanced settings button

1.3 Click on the Advanced tab then tick the check box with value "Disable Account"
1.4 To revoke follow the 1.1 & 1.2 now you can see a "Enable account" button click and enable
2. Terminal way
1. As a root user issue the following command in the terminal
$sudo passwd -l "username of the user to lock"
Thursday, August 25, 2011
ls command is your friend.. :)
How to know the inode of a file of directory:
$ls -i <- displays the innode of the file& directory in current directory
Ex:
$ ls -i
320785 a 320800 abc 320786 b 320787 c
The numbers represents the inode
How to list files sorted with modification time:
$ls -lt <- displays with time sorted manner with latest first
Ex:
$ ls -lt
total 4
-rw-r--r-- 1 hanu hanu 0 Aug 26 11:54 c.odt
drwxr-xr-x 2 hanu hanu 4096 Aug 26 11:53 empty_dir
-rw-r--r-- 1 hanu hanu 0 Aug 26 11:53 a.txt
-rw-r--r-- 1 hanu hanu 0 Aug 26 11:53 b.png
Note: if you want to reverse the output of ls add option -r
Ex:
$ ls -ltr
total 4
-rw-r--r-- 1 hanu hanu 0 Aug 26 11:53 b.png
-rw-r--r-- 1 hanu hanu 0 Aug 26 11:53 a.txt
drwxr-xr-x 2 hanu hanu 4096 Aug 26 11:53 empty_dir
-rw-r--r-- 1 hanu hanu 0 Aug 26 11:54 c.odt
Thursday, August 11, 2011
How to import mails to/Export mails from Icedove?
1. Download the following icedove add-on(ImportExporttools) from here.

2. Configure the add-on with your icedove client, steps are as follows.
Icedove --> Tools --> Add-ons
Now you will see a window like this ->
click on install button. Navigate to the downoalded ImportExportTools.xpi file and select it.
Now you will see a window like this ->
Once the "install" button enabled then click it. Your Icedove will automatically
 get restarted. Now you have the an option named "ImportExportTools"
in Icedove -> Tools ->
with sub options as show in the following image ->

So, Now if you want to export(backup) mails from icedove then select
Tools -> ImportExportTools -> Export options
If you want to import mails from some other backups(other mail client, but mbox format file) then select
Tools -> ImportExportTools -> Import options
Give a go through of all the available options in the Tools -> ImportExporttools and select the one which you want. Thats all now you are able to import/export backup your mails from icedove.
Note: Am using BOSS Linux 4.0, icedove version 3.0.7
Monday, July 4, 2011
When a new package installed.., What are the files installed & where they are?

In Debian linux(which uses apt-get & dpkg for package mangement) we can find out what are the files
get installed when a new package installed into your system. There are two ways to do this.
GUI Way:
System -> Administration -> Synaptic Package Manager
1. Now you got a GUI window. In that window on left side select "status" button & then "Installed"
2. Now you will see all the installed packages in your system on the right side.
3. Select the package to which you want to get the information, then right click select "properties"
4. Now you will get a new window with tabs "common, dependencies, installed files.. etc". Click the installed files tab.
Now you can see all the files installed in your system regarding that particular package with the full path to those files. :)
CUI Way(Terminal):
Issue the following command in terminal
#dpkg -L "packagename" | more
Note: Replace

This will be useful when you are not sure/know where the configuration, log files, command regarding particular package is.
Wednesday, March 23, 2011
What is cron,crontab & how to use it?
Cron :
is a daemon process which checks the crontab every minute for checking is there any scheduled task to execute. After this checking it goes to sleep and waits for the next minute to wokeup and check the crontab. The cron daemon is one of the bootup process which starts running from the bootup of the system. If you want to check the cron daemon process, issue the following command in terminal
$ps -e | grep cron
Crontab(le) :
is a file which has the entries for scheduled tasks. The entries follows the following syntax.
M H DOM MOY DOW Task(command)
Where,
M -> Minute entry. Value range (0-59)
H -> Hour entry Value range (0-23)
DOM -> Day of Month Value range (1-31)
MOY -> Month of the Year Value range (1-12)
DOW -> Day of week Value range (0-6) where 0-Sunday, 1-Monday, ....
Example entry:1
* <- means 'for all' The above entry will works on every minute and just appends the output of the command 'date' into the file '/tmp/every_minute.txt'. By opening the every_minute file in gedit you can see the output on every minute. If you want any other task to automate in the backend or chage the time when it needs to run configure the task entry as your need. Example entry:2
Min Hour DOM MOY DOW Task
30 22 * * * rm -r /tmp/*
The above entry will run everyday night 10.30(22.30) and removes everything from the /tmp/ Directory.
So how edit crontab:
In terminal type the following command
$crontab -e
Now the crontab file will opens in your default terminal editor(Mostly vi or vim). Now just add the Example 1 at the bottom of the file then save and exit.
Now open the /tmp/every_minute.txt file you can see it is updated each minute with the output of the date command.
For more information about cron, crontab
$man cron
$man 5 crontab
Location of files related to Cron :
Files in /var/spool/cron, /var/spool/anacron
Files in /etc/cron* ex. /etc/cront.d/, /etc/cront.weekly/
File /etc/crontab
Details Based on:
BOSS GNU/Linux (And most of the debian derived linux)
is a daemon process which checks the crontab every minute for checking is there any scheduled task to execute. After this checking it goes to sleep and waits for the next minute to wokeup and check the crontab. The cron daemon is one of the bootup process which starts running from the bootup of the system. If you want to check the cron daemon process, issue the following command in terminal
$ps -e | grep cron
Crontab(le) :
is a file which has the entries for scheduled tasks. The entries follows the following syntax.
M H DOM MOY DOW Task(command)
Where,
M -> Minute entry. Value range (0-59)
H -> Hour entry Value range (0-23)
DOM -> Day of Month Value range (1-31)
MOY -> Month of the Year Value range (1-12)
DOW -> Day of week Value range (0-6) where 0-Sunday, 1-Monday, ....
Example entry:1
Min Hour DOM MOY DOW Task
* * * * * date >> /tmp/every_minute.txt
* <- means 'for all' The above entry will works on every minute and just appends the output of the command 'date' into the file '/tmp/every_minute.txt'. By opening the every_minute file in gedit you can see the output on every minute. If you want any other task to automate in the backend or chage the time when it needs to run configure the task entry as your need. Example entry:2
Min Hour DOM MOY DOW Task
30 22 * * * rm -r /tmp/*
The above entry will run everyday night 10.30(22.30) and removes everything from the /tmp/ Directory.
So how edit crontab:
In terminal type the following command
$crontab -e
Now the crontab file will opens in your default terminal editor(Mostly vi or vim). Now just add the Example 1 at the bottom of the file then save and exit.
Now open the /tmp/every_minute.txt file you can see it is updated each minute with the output of the date command.
For more information about cron, crontab
$man cron
$man 5 crontab
Location of files related to Cron :
Files in /var/spool/cron, /var/spool/anacron
Files in /etc/cron*
File /etc/crontab
Details Based on:
BOSS GNU/Linux (And most of the debian derived linux)
Thursday, March 3, 2011
A simple way to setup a Centralised log Server in Linux
In Linux using UDP, or TCP we can send the logs of various machine into a single machine(Centralised log server).
We need to Configure the machines
1. Server machine - A centralised log server where all the logs are stored.
2. Client machine - which sends logs to the remote machine.
Server side configuration:
1. Open the /etc/rsyslog.conf and find the line "ModLoad" under the 'MODULES' part.
2. If you want to receive the logs by UDP then uncomment the following lines
$ModLoad imudp
$UDPServerRun 514
3. If you want to receive the logs by TCP then uncomment the following lines
#$ModLoad imtcp
#$InputTCPServerRun 514
Note: here 514 is port number
4. Edit the /etc/default/rsyslog file and change the RSYSLOGD_OPTIONS="-r -x -c1"
Note: -r <- Allow remotesystems to log their log entries into the server machine
-x <- Disables DNS lookups on messages received with -r
-c1 or -c2 <- Compatability mode (must not -c3 or -c4 because the compatability mode greater than 2 now allow remot log)
4.1 Restart the rsyslog by $sudo /etc/init.d/rsyslog restart
4.2 Now move to the Client side configuration. After the configuration finished restart the /etc/init.d/rsyslog there also
Now the remote logs are start logged in the log server machine you can veryfy them by $tail /var/log/auth.log. (change user in client machine and see that was logged in the auth.log)
If remote logs not works then do the following steps also in the log-server machine.
5. Open and edit the /etc/default/syslogd file and change the SYSLOGD as follows SYSLOGD="-r -m 0"
Now do the steps 4.1 & 4.2
6. Open and edit /etc/init.d/rsyslog file and change the RSYLOGD_OPTIONS into RSYLOGD_OPTIONS="-r" then do the steps 4.1 & 4.2
Client side configuration:
1. backup the /etc/rsyslog.conf file in anothername say $mv /etc/rsyslog.conf /etc/rsyslog.conf.bak
2. create a new /etc/rsyslog.conf file with the following content.
*.* @Logserver_ipaddress:portnumber
Thats it.. :)
Note: The linux distro am using is BOSS-4.0 (Debian based linux)
We need to Configure the machines
1. Server machine - A centralised log server where all the logs are stored.
2. Client machine - which sends logs to the remote machine.
Server side configuration:
1. Open the /etc/rsyslog.conf and find the line "ModLoad" under the 'MODULES' part.
2. If you want to receive the logs by UDP then uncomment the following lines
$ModLoad imudp
$UDPServerRun 514
3. If you want to receive the logs by TCP then uncomment the following lines
#$ModLoad imtcp
#$InputTCPServerRun 514
Note: here 514 is port number
4. Edit the /etc/default/rsyslog file and change the RSYSLOGD_OPTIONS="-r -x -c1"
Note: -r <- Allow remotesystems to log their log entries into the server machine
-x <- Disables DNS lookups on messages received with -r
-c1 or -c2 <- Compatability mode (must not -c3 or -c4 because the compatability mode greater than 2 now allow remot log)
4.1 Restart the rsyslog by $sudo /etc/init.d/rsyslog restart
4.2 Now move to the Client side configuration. After the configuration finished restart the /etc/init.d/rsyslog there also
Now the remote logs are start logged in the log server machine you can veryfy them by $tail /var/log/auth.log. (change user in client machine and see that was logged in the auth.log)
If remote logs not works then do the following steps also in the log-server machine.
5. Open and edit the /etc/default/syslogd file and change the SYSLOGD as follows SYSLOGD="-r -m 0"
Now do the steps 4.1 & 4.2
6. Open and edit /etc/init.d/rsyslog file and change the RSYLOGD_OPTIONS into RSYLOGD_OPTIONS="-r" then do the steps 4.1 & 4.2
Client side configuration:
1. backup the /etc/rsyslog.conf file in anothername say $mv /etc/rsyslog.conf /etc/rsyslog.conf.bak
2. create a new /etc/rsyslog.conf file with the following content.
*.*
Thats it.. :)
Note: The linux distro am using is BOSS-4.0 (Debian based linux)
Tuesday, February 8, 2011
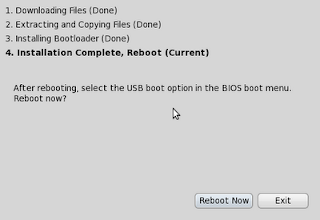
How to create a BOSS Linux's installable USB drive using unetbootin?
1. First you need to update with repository
$sudo apt-get update
2. Install the unetbootin package using
$sudo apt-get install unetbootin
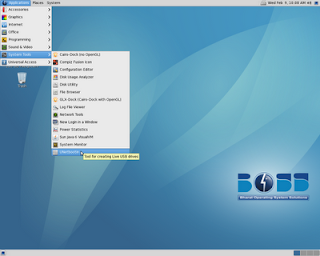
3. Now you have a new menu entry in
“Applications → System tools → UnetBootin”
4. Format the USB drive and then copy the BOSS linux's ISO image into it.
5. Open the GUI for creating the Installable USB drive
“Applications → System tools → UnetBootin”
now you will get the following GUI application

6. Select the custom option then browse and select the kernel (vmlinuz), initrd and paste “video=vesa:ywrap,mtrr vga=788” into the Options field
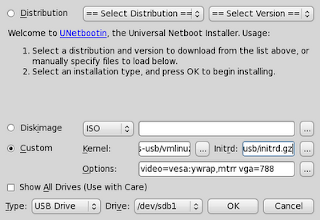
7. Now select Type as USB Drive, Drive as /dev/sdb(n) [n=1,2,3 as no.of usb drives inserted in the system] then click ok.
8. Click Exit. Thats all Installable USB is ready.
9. Now your USB drive has the following files.
1. ISO Image of BOSS linux (Copied manually by us)
2. ldlinux.sys
3. menu.c32
4. syslinux.cfg
5. ubninit
6. ubnkern
$sudo apt-get update
2. Install the unetbootin package using
$sudo apt-get install unetbootin
3. Now you have a new menu entry in
“Applications → System tools → UnetBootin”

4. Format the USB drive and then copy the BOSS linux's ISO image into it.
5. Open the GUI for creating the Installable USB drive
“Applications → System tools → UnetBootin”
now you will get the following GUI application

6. Select the custom option then browse and select the kernel (vmlinuz), initrd and paste “video=vesa:ywrap,mtrr vga=788” into the Options field

7. Now select Type as USB Drive, Drive as /dev/sdb(n) [n=1,2,3 as no.of usb drives inserted in the system] then click ok.
8. Click Exit. Thats all Installable USB is ready.

9. Now your USB drive has the following files.
1. ISO Image of BOSS linux (Copied manually by us)
2. ldlinux.sys
3. menu.c32
4. syslinux.cfg
5. ubninit
6. ubnkern
Tuesday, January 18, 2011
how to find the pattern within files?
Using grep we achieve this..
Say we have to find out the word "gdk" from all the '.c' files in a directory.. the command would be
$grep -i "pattern" files
ex: $grep -i "gtk" *.c <===== Will search all .c files in the current directory.
ex: $grep -i "gtk" file1, file.23, file <== Will search only in the specified files.
Find and remove duplicate photos in Linux distros..
While searching I got to know about two softwares for finding the duplicate images in various folders...
1. GQview
2. Digikam (KDE desktop)
Subscribe to:
Posts (Atom)