Thursday, December 22, 2011

How to generate package download script using synaptic?

This post describes how to install linux (.deb)packages into a linux machine which have no/low speed internet connection[In linux one should have a good internet connection to get connected to repository to install any new packages].  Ofcourse this will be achieved only through a another linux machine(of same distro&same version unless you know how to modify /etc/apt/sources.list and update the linux machine) that has good internet connection like your Relative's/friend's machine or a linux box in browsing center etc.  I am explaining the following thing with BOSS GNU/Linux 4.0(savir version name).

We can achieve the installation of a package into a machine with low/no internet connection
Method 1:
1. The machine in which you want to install  go  System -> Adminstration -> Synaptic Package Manager


2. Select the package which you want to install.  
 Note: Synaptic itself selects all the other dependency packages that are needed to install the package you selected.  You can see a green color tick mark, those packages are going to be installed
3. Now click on File -> Generate Download script, give a file name for the script and select path to save it.
4. Keep the resultant file with you & execute that shell script file in a machine which have the internet connection, it will downloads all the packages(.deb files) that are needed to install the packages you selected.  
5. Copy all those files to your linux machine and install through terminal as follows
$cd /path_to/deb_files/directory
$sudo dpkg -i *.deb
6. Now the packages is installed successfully thats all.

Method 2:
Another way, is install the package which have a good internet connection and copy the .deb files downloaded for that installation, use it in your system
1. First clean the archives directory
$sudo apt-get clean
2. Install the package which you want using
$sudo apt-get install <package_name>
3. copy all the .deb files from the /var/cache/apt/archives directory to your removable media(pendrive)
$mkdir /media/<your_perndrive_moutn_point>/deb_directory
$sudo cp /var/cache/apt/archives/*.deb /media/<your_perndrive_moutn_point>/deb_directory
4. Insert the pendrive in your machine and do the following
$cd /media/your_pendrive_mount_point/deb_directory
$sudo dpkg -i *.deb

Thats all the packages are installed in your machine...  This two methods are useful when you try to install huge packages like office, gimp, blender etc...

any how Methode 1 is best one as it creates the script to download the .deb packages that actually is needed to install into your machine, and it doesn't install only downloads.  

Monday, December 19, 2011

How to create a simple local apt repository?

This post is regarding debian based distros which supports .deb, so the procedures are not applicable for distros that uses .rpm like fedora, redhat etc..
Requirements:
build-essential
dpkg-scanpackages
gzip

How to do:
1. Create a directory named "repo" in your home directory.  say $mkdir /home/test/repo
2. Copy all the debs you have into the /home/test/repo
3. Open your terminal as root and do the following & change directory to /home/test/repo
    #mkdir /home/test/repo
     #cd /home/test/repo
     #dpkg-scanpackages . /dev/null | gzip -9c > ./Packages.gz

Here, '.' specifies -> present working directory
/dev/null specifies -> override file, as we not going to use override file we give /dev/null
gzip -9c>./Packages.gz -> Compresses the package details into the file Packages.gz
(Packages.gz will be created within the present working directory)
4. add the following line in your /etc/apt/sources.list file
deb file:/home/test/repo/ /
5. Update your system using apt-get update command
#apt-get update
6. Thats all now your /var/lib/apt/lists will be updated
Note: Remember now whenever you use "apt-cache search" "apt-get install" it only installs from debs inside /home/test/repo.

Thursday, December 1, 2011

Are you facing the font rendering problem in your tamil-blog..?


My tamil blog fonts are not rendering correctly in browser...
Here is the correct solution..
What to do:
1. Do remove Freesans, Freeseriff, sans-seriff fonts from your blog's template.

How to do:
1. Open your tamil-blog in browser and sign-in [in top-right corner]
2. In Design view click on template --> Edit Html --> Proceed


3. Copy the full html content into your text editor (notepad/gedit)
4.  Then find & remove the Freesans, Freeserif, sans-seriff fonts from all styles(css)
5. Save the template(Modification)
Note: You can see the preview of your changes, and accordingly customize/fine-tune your template.
6. Once you are satisfied save the template.. thats all.

Conclusion:
For make your blog/website to be better rendered with tamil fonts in all machines & browsers
1. It is advised don't use Freesans, Freeserif fonts in your blog/website.  We are not sure all the machines have the font Freesans, Freeserif.
If you want to see other's blog/website which is not rendered properly with tamil fonts
2. You need to remove Freesans, Freeserif fonts from your machine(linux).  For that read this my another post regarding font rendering issue 

Wednesday, November 9, 2011

BOSS GNU/Linux Implementation in Tamilnadu government

Its Great time to BOSS GNU/Linux... after making its way to get installed in Free Laptops of TN Govt's Free laptop for students scheme.  Now TamilNadu Government is issued a GO(Government Order) regarding the implementation of BOSS GNU/Linux in the IT department.  

For more information Read here TN Govt's GO of BOSS GNU/Linux Implementation

So, Now one more feather is added to BOSS GNU/Linux's crown.  Sure this will help BOSS Linux to make its visibility all over tamil nadu.

Its Happiest & Great news for the OpenSource Lovers... :)

Sunday, October 23, 2011

Tamil fonts not displayed properly in browsers.. in linux..

Once i came to know about tamil lyricist Arivumathi's blog.  So, i open it in my browser but tamil fonts are not shown properly.  The fonts are either like a rectangle or torn.  I try to see the blogpost in tamil properly, and atlast i got the following solution..

The solution is removing the Freesans, Freeserif fonts from your linux system(BOSS, ubuntu, all debian derived linux).  These fonts are in /usr/share/fonts/truetype/freefont directory.  Either remove the fonts by deleting it or copy it to some other place but not in the fonts directory.  Thats all now the blog is shown well in tamil.  the following images are

Tamil blog with tamil font rendering problem
Tamil blog after font problem fixed

Tuesday, October 18, 2011

Do you hear about Vanilla kernel?

Simply all the kernel that downloaded from the http://kernel.org/ are "Vanilla Kernel".


 We know that the home site of the linux kernel is at http://kernel.org/.  All the linux distributions will use the stable linux kernel from here(of different kernle versions[for ex: 2.6.32.46, 2.6.35.14 etc]). 

  Here comes the difference, so some distributions will patch the kernel before use it in its distribution.  For example SUSE's kernel patch for boot screen animation, Debian's kernel patch for LOGO , bad-ram.  [ Page to debian's kernel patches ]. 

 Now consider the security patches like SElinux, grsecurity.  The team that works on these projects are not able to know, monitor & follow back the kernel patch by different linux distributions.  So, they do write patches only to the kernel in http://kernel.org/.

 So, its true that the kernel you are using may not be completely same as the Vanilla kernel, even if they are same kernel versions.  Some features/securites that patched in one distribution and may not be patched in another.  So if one want a Plain kernel he should go with vanilla kernel download only from http://kernel.org/ not from their distribution's repository.

Friday, September 30, 2011

Lost your grub after windows installation.. How to update, reinstall the grub in (BOSS) Linux?

Scenario:
  Once windows(vista, 7, xp) installed after the linux installation then one will lost his grub and there is no way to select the OS during the system startup(Dual Boot).  By default windows installs its boot loader into the MBR and not care about the other OS in the same machine.
So how to get the old grub with the new Windows OS entry in it..? here follows the steps..

1. Insert your BOSS Linux DVD(live, install, utility all are in the same DVD) in the drive and reboot your
system.
2. Select the live option and boot your system in live mode.
3. Click and mount the Linux partition whose grub is going to be used.
4. Now copy the mount location in the addressbar(location: it is somewhat like /media/some_chars_numbers)
5. Open your "root terminal" Applications --@ Accessories --@ Root terminal and issue the following commands
6. #mount --bind /dev /media/some_chars_numbers/dev
7. #chroot /media/some_chars_numbers
8. #update-grub
This updates the grub with the newly installed Windows OS entry in it
9. #grub-install /dev/sda
This installs the grub in the MBR(Master Boot Record).

Thats all.. now reboot the system and remove the DVD.  Now system will loads with the new updated grub where you can see all the OS available in your system and you can select(dual/multi boot) the OS which you want to login.  That's all :)

How to configure TVS Dot matrix printer in BOSS

1. Click on System -> Administration -> Printing.  Give root password if prompted, a GUI application will open.
2. Click on Server -> Add -> printer.  If your dot matrix printer is connected with your system then it will be automatically get detected, then click on the printer name and click the forward button.
3.  Now you can see the driver for your printer model
if so select and forward else select the Epson-150 driver(it is very generic driver supports most of the dot-matrix printer.)

Note:
Once your printer configured successfully you can share your printers with others(who are connected with your computer with LAN cord) easily.  For that you need to enable the shared option by System -> Administration -> Printing -> right click on the printer icon -> properties -> Policies -> tick mark on the option "Shared"

Saturday, September 17, 2011

How to enabe touchpad in BOSS GNU/Linux?

Do the following steps
Click -> System -> Preferences -> Mouse
Now you will get a application opened like this.


Now click on tab "touch pad" and enable the option by click tick mark on
"Enable mouse clicks with touchpad"
thats all now you can use your touch pad.. :)

Sunday, September 11, 2011

Openoffice Send -> document as email, email as pdf not working in Linux? How to fix it..

First Check whether Openoffice is configured for internet or not and is it configured correctly.
 How to check it?
  Open your openoffice writer -> tools -> Options -> Internet -> Email

See whether the Configured email program is correct, do you installed that particular email program(say for ex: evolution, thunderbird, icedove).

Openoffice writer -> Tools -> Options -> Internet
1.  If the email program is not installed then install it.
or

2.  If you are using another email program then update the path(invoking command) of that email program there.


Now it will work.  Thats all...!


Tuesday, September 6, 2011

No display and Input signal out of range error in Linux?

Some times after the installation of linux(Debian based) one will end-up with the terminal and no GUI.  So, how can we fix it? Some quick checks 
1. Restart the gdm service by following command
$sudo /etc/init.d/gdm restart

2. Start the x-server
$sudo startx

3. Even after this if you are not getting the GUI and or got the error message like "Input signal out or range" then you need to edit your xorg.conf file.  This file is at /etc/X11/xorg.conf

i  ) Open the /etc/X11/xorg.conf file in your favorite editor with root privilege
ii ) Go to the section "Screen"  -> "Display" -> "Modes" put only the value "1024x768" and remove the all other values.  (If you know the correct resolution of your monitor the adding it is not a problem.)
iii) save the changes then again start the x-server(as like in quick check 2)

Hope this will help you.
Note: This is worked out in EduBOSS-2.0 and works fine.  EduBOSS is a linux distro for the school, college students which is derived from BOSS GNU/Linux.

Friday, August 26, 2011

How to fix "Missing plugin error in google-chrome in linux" when open/download pdf file?


I tried to download a pdf file using google-chrome, when i do so google-chrome tries to open it in browser itself and shows the "Missing plug-in" error as shown in the following image.
The solution is as follows.

1. Open a new google-chrome brower window.

2. In address bar type "about:plugins" without quotes and hit enter. Now you will see the following details in you
r browser. The following image shows it.
3. Now click on the disable button of "MozPlugger 1.14.1 handles Quick
Time and Windows Media Player Plugin"

Thats all now you can download pdf files as like any other files, now chrome won't try to open it in browser itself, instead it prompts you to give filename for saving it.


give your comments & feedbacks, bouquets & brickbats.. that will let me give the blogposts with more and exact information needed by others. 

Thursday, August 25, 2011

ls command is your friend.. :)

How to know the inode of a file of directory:
$ls -i <- displays the innode of the file& directory in current directory
Ex:
$ ls -i
320785 a 320800 abc 320786 b 320787 c
The numbers represents the inode

How to list files sorted with modification time:
$ls -lt <- displays with time sorted manner with latest first
Ex:
$ ls -lt
total 4
-rw-r--r-- 1 hanu hanu 0 Aug 26 11:54 c.odt
drwxr-xr-x 2 hanu hanu 4096 Aug 26 11:53 empty_dir
-rw-r--r-- 1 hanu hanu 0 Aug 26 11:53 a.txt
-rw-r--r-- 1 hanu hanu 0 Aug 26 11:53 b.png

Note: if you want to reverse the output of ls add option -r
Ex:
$ ls -ltr
total 4
-rw-r--r-- 1 hanu hanu 0 Aug 26 11:53 b.png
-rw-r--r-- 1 hanu hanu 0 Aug 26 11:53 a.txt
drwxr-xr-x 2 hanu hanu 4096 Aug 26 11:53 empty_dir
-rw-r--r-- 1 hanu hanu 0 Aug 26 11:54 c.odt


Wednesday, August 24, 2011

How to initialize sound in debian based Linux?

I met with this weird problem today, No sound output from my system with any player say banshee, totem etc... But yesterday it works fine. I checked all the sound settings in volume control it seems everything is perfect, but no sound output :(. Atlast i got the solution for this. Just give the following command in the terminal as root.

#alsactl init
The above command initializes the alsa sound card driver :). So after this audio works find

My audio driver is
:~$ lspci | grep -i audio
00:1b.0 Audio device: Intel Corporation 82801JD/DO (ICH10 Family) HD Audio Controller (rev 02)

My system's snd module details:
:~$ lsmod | grep snd
snd_hda_codec_realtek 163294 1
snd_hda_intel 16811 4
snd_hda_codec 46002 2 snd_hda_codec_realtek,snd_hda_intel
snd_hwdep 4054 1 snd_hda_codec
snd_pcm_oss 28671 0
snd_mixer_oss 10461 1 snd_pcm_oss
snd_pcm 47226 4 snd_hda_intel,snd_hda_codec,snd_pcm_oss
snd_seq_midi 3576 0
snd_rawmidi 12513 1 snd_seq_midi
snd_seq_midi_event 3684 1 snd_seq_midi
snd_seq 35463 2 snd_seq_midi,snd_seq_midi_event
snd_timer 12258 3 snd_pcm,snd_seq
snd_seq_device 3673 3 snd_seq_midi,snd_rawmidi,snd_seq
snd 34375 17 snd_hda_codec_realtek,snd_hda_intel,snd_hda_codec,snd_hwdep,snd_pcm_oss,snd_mixer_oss,snd_pcm,snd_rawmidi,snd_seq,snd_timer,snd_seq_device
soundcore 3450 1 snd
snd_page_alloc 5045 2 snd_hda_intel,snd_pcm

# <- Refers the root user in terminal
$ <- Refers the non-root user in terminal
Am using BOSS 4.0 Linux.

Thursday, August 11, 2011

How to import mails to/Export mails from Icedove?


1. Download the following icedove add-on(ImportExporttools) from here.

2. Configure the add-on with your icedove client, steps are as follows.
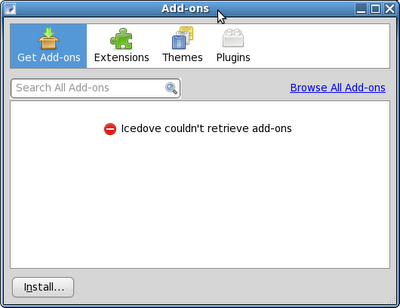
Icedove --> Tools --> Add-ons

Now you will see a window like this ->


click on install button. Navigate to the downoalded ImportExportTools.xpi file and select it.

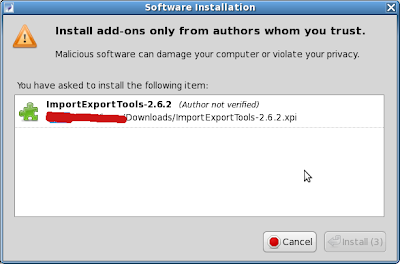
Now you will see a window like this ->

Once the "install" button enabled then click it. Your Icedove will automatically get restarted. Now you have the an option named "ImportExportTools"
in Icedove -> Tools ->

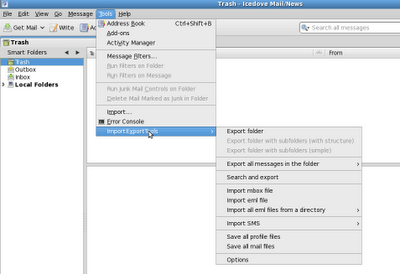
with sub options as show in the following image ->

So, Now if you want to export(backup) mails from icedove then select
Tools -> ImportExportTools -> Export options

If you want to import mails from some other backups(other mail client, but mbox format file) then select
Tools -> ImportExportTools -> Import options

Give a go through of all the available options in the Tools -> ImportExporttools and select the one which you want. Thats all now you are able to import/export backup your mails from icedove.

Note: Am using BOSS Linux 4.0, icedove version 3.0.7

Monday, July 4, 2011

When a new package installed.., What are the files installed & where they are?


In Debian linux(which uses apt-get & dpkg for package mangement) we can find out what are the files
get installed when a new package installed into your system. There are two ways to do this.

GUI Way:
System -> Administration -> Synaptic Package Manager
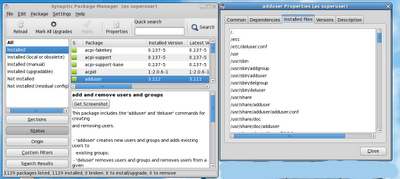
1. Now you got a GUI window. In that window on left side select "status" button & then "Installed"
2. Now you will see all the installed packages in your system on the right side.
3. Select the package to which you want to get the information, then right click select "properties"
4. Now you will get a new window with tabs "common, dependencies, installed files.. etc". Click the installed files tab.


Now you can see all the files installed in your system regarding that particular package with the full path to those files. :)

CUI Way(Terminal):
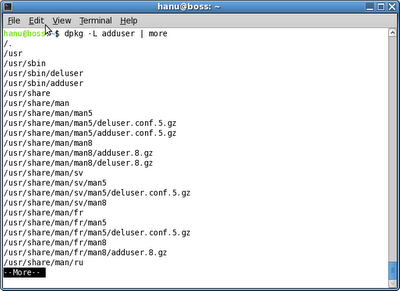
Issue the following command in terminal
#dpkg -L "packagename" | more
Note: Replace with the package which you want without quotes. I am using the debian derived Indian linux distro "BOSS- Bharat Operating System Solutions"


This will be useful when you are not sure/know where the configuration, log files, command regarding particular package is.

Thursday, June 2, 2011

How to remove continuous(unnecessary) occurance of a character?

In Debian Linux we have one superb command tool called 'tr' [Translate or delete characters]. This simple handy tool has may usages, here am going to explain how to remove sequence of repeated (same)character.

The date command will produce output as follows
Ex-1-scenario:
$date
Thu Jun 2 17:10:17 IST 2011
Note: There are 2 spaces between the Month(Jun) and the date(2) because the date is single digit.
Ex-2-scenario:
$date
Thu Jun 22 17:10:17 IST 2011

So, if i try to cut the date using cut command then with empty space( ) as delimiter. then the field count will change.
For example:
Ex-1-scenario:
In f1-Thu f2-Jun f3-( ) f4-2 f5-17:10:17 f6-IST f7-2011

Ex-2-scenario:
In f1-Thu f2-Jun f3-2 f4-17:10:17 f5-IST f6-2011

So, how can i split fields correctly regardless of the single or double digit dates. Here comes our tr tool. It will be done as follows
for both scenario-1, scenario-2
$date | tr -s ' '
Note: if you use tr -s 'y' it will remove the continues occarance of 'yyyyy' and put only one single 'y' there.
will output with single space( ) between fields. Happy scripting.. :)

For more information see the man page of tr, date commands. For online man pages of tr, date.

Thursday, May 26, 2011

How to access a directory as root/Super user in Linux?

In debian Linux if you are logged in as a ordinary(lower previleged user), then you cant access all the directories in the filesystem. Becayse if tge security restrictions. So, if you want to access a particular directory which needs the higher privelege(say /root) you have 2 choices.

1. By Terminal
Just open the terminal by
1) Applications -> Accessories -> Terminal
or
2) alt + f2 -> type "gnome-terminal"(witout quotes) & hit enter key

Now change yourself as root by issuing the command $su root & corresponding Password and access the directory what you want.

2. By GUI(using Nautilus)
Right click the directory which you want to access as super/root user. Then select the option "open as administrator".

Now it prompts you for the Admin(Root) password then it open that directory as a root user. so, now you can access all the files with read,write, execute permission.

Note: For getting the option "open as administrator" your system must installed the package "nautilus-gksu". If not install it first with the following command '$sudo apt-get install nautilus-gksu'(use without quotes,dollar symbol)

Note:(Am using BOSS Linux - a famous indian distro based on Debian developed by CDAC).

Thursday, May 19, 2011

Want to see What happens during system bootup(Linux) & startup services/scripts

1. While booting the system boot it in single user mode.
i.e press ctrl+alt+f1 <- if you have any problem to see the terminal(No GUI splash image) with messages and informations do the following
Note:
In BOSS linux one can see the background startup services and their messages by pressing the F2 key
during startup of the system(i.e during the 'Splash image with boss logo' loaded)

2. While booting select the OS, in which you want to login using up/down arrow now press 'e'. It leads you to the grub menu and now you can edit the
booting options. So now we want to see the messages from the startup services for that just remove the phrase 'splash VGA=xyz quiet'. Then press "ctrl+x" to boot the system. By doing this we are just denying the splash image to load. So we can see the startup services and their messages.

Note: If the messages runs fast and moves in a flash, then just add 'sleep 50' in the startup script (those scripts in /etc/init.d/*) which you want to monitor.

Monday, March 28, 2011

Compiz 2 Desktop(instead of 4) problem... How to fix it?

Compiz is one of the superb package(window manager) that gives a nice 3d look and feel even apple's OS can't be compete with it.

Most of the new users who installed the Compiz got the problem of getting only 2 desktops instead of default 4. So, how could we fix it..

1. After installing the Compiz one got the menu entry in Systemtools.
so, Applications - > System tools - > Compiz fusion icon
If we click the that a new icon will be placed in the panel.

2. Now right click on that icon, we get a pop up options like.. compiz options, reload window manager, etc... find the settings manager and click on that.

3. Now we get compiz Configuration setting manager, in that select general tab. Then select General options.

4. In general Options select the Desktop size. In that there will be a slider with the name "Horizontal Virtual Size" with the value 2. Change it to the value (4) you wish(number of desktops). That's it.

The real thing you can create as much desktop as you wish..
Enjoy & experience the linux...

Note: Am using BOSS GNU/Linux.. (Debian derived) An Indian Linux Distro. for more info http://bosslinux.in/ http://wiki.bosslinux.in/
Want to read more about compiz. Refer wikipedia in this link http://en.wikipedia.org/wiki/Compiz

Friday, March 25, 2011

How to convert .ogv file into .mp4 file

1. Download the Handbrake-CLI software package from the following site. http://handbrake.fr/

2. Install the deb using the following command. $sudo dpkg -i

3. Now you got the command 'HandBrakeCLI'. now issued the command as follows
$HandBrakeCLI -i -o

thats all.

Wednesday, March 23, 2011

What is cron,crontab & how to use it?

Cron :
is a daemon process which checks the crontab every minute for checking is there any scheduled task to execute. After this checking it goes to sleep and waits for the next minute to wokeup and check the crontab. The cron daemon is one of the bootup process which starts running from the bootup of the system. If you want to check the cron daemon process, issue the following command in terminal

$ps -e | grep cron


Crontab(le) :
is a file which has the entries for scheduled tasks. The entries follows the following syntax.
M H DOM MOY DOW Task(command)
Where,
M -> Minute entry. Value range (0-59)
H -> Hour entry Value range (0-23)
DOM -> Day of Month Value range (1-31)
MOY -> Month of the Year Value range (1-12)
DOW -> Day of week Value range (0-6) where 0-Sunday, 1-Monday, ....

Example entry:1

Min Hour DOM MOY DOW Task

*   *    *   *   *   date  >> /tmp/every_minute.txt 


* <- means 'for all' The above entry will works on every minute and just appends the output of the command 'date' into the file '/tmp/every_minute.txt'. By opening the every_minute file in gedit you can see the output on every minute. If you want any other task to automate in the backend or chage the time when it needs to run configure the task entry as your need. Example entry:2
Min Hour DOM MOY DOW Task
30 22 * * * rm -r /tmp/*

The above entry will run everyday night 10.30(22.30) and removes everything from the /tmp/ Directory.

So how edit crontab:
In terminal type the following command
$crontab -e

Now the crontab file will opens in your default terminal editor(Mostly vi or vim). Now just add the Example 1 at the bottom of the file then save and exit.
Now open the /tmp/every_minute.txt file you can see it is updated each minute with the output of the date command.

For more information about cron, crontab
$man cron

$man 5 crontab


Location of files related to Cron :
Files in /var/spool/cron, /var/spool/anacron
Files in /etc/cron* ex. /etc/cront.d/, /etc/cront.weekly/
File /etc/crontab


Details Based on:
BOSS GNU/Linux (And most of the debian derived linux)

Tuesday, March 22, 2011

Want to see the Recently Installed/UnInstalled packages in your system?

We know that everything is loged in Linux. The installation, Uninstallation is not exception. The full details of latest installation, removal package is stored in the file

/var/log/apt/history.log

So if one accidently uninstalls a package and not know the name, he can easily find it in this log file. :)

Want to install "codec" for multimedia applications automatically?

In Linux some may face that some of their songs, videos(different formats) are not playing. So one need to install the corresponding plugins, codecs.
So what if when we try to play a song, video of new format the player itself findout the corresponding plugins and install by itself(Assumed you have internet conenction).

For this there is one package application called "gnome-codec-install" [Mostly it preinstalled in your Linux OS(Debian/Debian derived)]. If not installed prior. Just install it using

1. System -> Administration -> synaptic manager then serarch the package name and install.

2.In terminal $sudo apt-get install gnome-codec-install

So after successful installation when you try to play a song, video whose codec not installed yet will automaticall connect to the repository and installs then play.

Thursday, March 3, 2011

A simple way to setup a Centralised log Server in Linux

In Linux using UDP, or TCP we can send the logs of various machine into a single machine(Centralised log server).
We need to Configure the machines
1. Server machine - A centralised log server where all the logs are stored.
2. Client machine - which sends logs to the remote machine.

Server side configuration:
1. Open the /etc/rsyslog.conf and find the line "ModLoad" under the 'MODULES' part.

2. If you want to receive the logs by UDP then uncomment the following lines
$ModLoad imudp
$UDPServerRun 514

3. If you want to receive the logs by TCP then uncomment the following lines
#$ModLoad imtcp
#$InputTCPServerRun 514

Note: here 514 is port number

4. Edit the /etc/default/rsyslog file and change the RSYSLOGD_OPTIONS="-r -x -c1"

Note: -r <- Allow remotesystems to log their log entries into the server machine
-x <- Disables DNS lookups on messages received with -r
-c1 or -c2 <- Compatability mode (must not -c3 or -c4 because the compatability mode greater than 2 now allow remot log)

4.1 Restart the rsyslog by $sudo /etc/init.d/rsyslog restart
4.2 Now move to the Client side configuration. After the configuration finished restart the /etc/init.d/rsyslog there also
Now the remote logs are start logged in the log server machine you can veryfy them by $tail /var/log/auth.log. (change user in client machine and see that was logged in the auth.log)
If remote logs not works then do the following steps also in the log-server machine.

5. Open and edit the /etc/default/syslogd file and change the SYSLOGD as follows SYSLOGD="-r -m 0"
Now do the steps 4.1 & 4.2

6. Open and edit /etc/init.d/rsyslog file and change the RSYLOGD_OPTIONS into RSYLOGD_OPTIONS="-r" then do the steps 4.1 & 4.2


Client side configuration:
1. backup the /etc/rsyslog.conf file in anothername say $mv /etc/rsyslog.conf /etc/rsyslog.conf.bak

2. create a new /etc/rsyslog.conf file with the following content.
*.* @Logserver_ipaddress:portnumber


Thats it.. :)
Note: The linux distro am using is BOSS-4.0 (Debian based linux)

Tuesday, February 8, 2011

How to create a BOSS Linux's installable USB drive using unetbootin?

1. First you need to update with repository
$sudo apt-get update

2. Install the unetbootin package using
$sudo apt-get install unetbootin

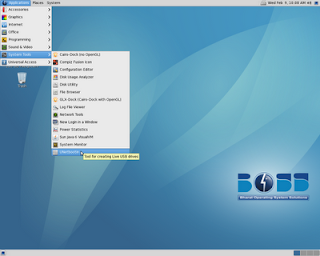
3. Now you have a new menu entry in
“Applications → System tools → UnetBootin”


4. Format the USB drive and then copy the BOSS linux's ISO image into it.

5. Open the GUI for creating the Installable USB drive
“Applications → System tools → UnetBootin”
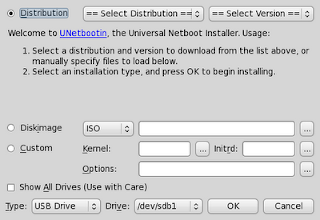
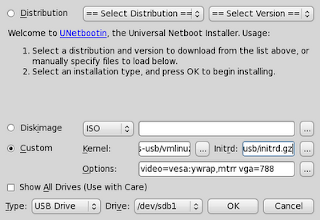
now you will get the following GUI application


6. Select the custom option then browse and select the kernel (vmlinuz), initrd and paste “video=vesa:ywrap,mtrr vga=788” into the Options field


7. Now select Type as USB Drive, Drive as /dev/sdb(n) [n=1,2,3 as no.of usb drives inserted in the system] then click ok.

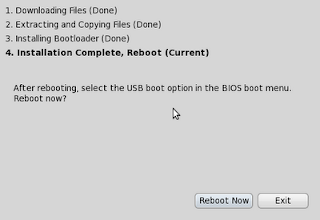
8. Click Exit. Thats all Installable USB is ready.


9. Now your USB drive has the following files.
1. ISO Image of BOSS linux (Copied manually by us)
2. ldlinux.sys
3. menu.c32
4. syslinux.cfg
5. ubninit
6. ubnkern

Monday, January 31, 2011

How to create printable version of a man page..?

Most of us are always feel boring to read man pages in terminal window. what if we have a printable version of a particular command's manpage.? Nice isn't it.. so, how we can create a printable version of a manpage...

Step 1: Issue the following command in terminal
$man -t [the_command_you_wish] > destination_file_path.ps

Ex:$man -t mkdir > ~/Desktop/mkdirs_manpage_printableversion.ps

Now you got a file named " mkdirs_manpage_printableversion.ps " in your Desktop :). you can now print and use it..

Note: .ps is the default file type used to print.

Tuesday, January 18, 2011

how to find the pattern within files?

Using grep we achieve this..
Say we have to find out the word "gdk" from all the '.c' files in a directory.. the command would be

$grep -i "pattern" files

ex: $grep -i "gtk" *.c          <===== Will search all .c files in the current directory.
ex: $grep -i "gtk" file1, file.23, file <== Will search only in the specified files.

Find and remove duplicate photos in Linux distros..

While searching I got to know about two softwares for finding the duplicate images in various folders...
1. GQview
2. Digikam (KDE desktop)

Tuesday, January 11, 2011

how to get the information/details about the installed packages in debian linux?

$dpkg -s "package-name"

-s <- is the option for find out the status of the given gives information like

1. The package is installed or not, removed
2. size of the installed package
3. Architecture support
4. Dependency
5 Version and so..

How to fetch n number of lines before or after a pattern match..

Lets assume there is a file which has 1000 lines. Now i want to see 20 lines from the a pattern (say pattern is 'top secret'). How come..?

Step 1: open the file in command prompt using 'cat' command with -n option(this option shows the content of the file with the line numbers).

Ex: $cat -n ./secrets.txt

step 2: piping the output of the 'step 1' to grep command with -i option(this ignores the case of given pattern i.e case insensitive) and pattern.

Ex: $cat -n ./secrets.txt | grep -i 'top secret'

step 3: now your output gives a line number(say 654) with the give pattern match, so, now using the head & tail commands with the line numbers we get the required output.

Ex: $head -654 | tail -10

Thats all.. :)

Monday, January 10, 2011

How to find out the package from which a command (comes) is available?

From starting of the linux usage we all using the command mkdir, copy, mv .. etc.
So do ever wish to identify from which package a certain command is (installed) availabe.

If you got a doubt like so, here is the solution how to find the package name that provide the certain command.

1. First find out the place where the command(binary) is? using

$whereis
Ex:$whereis mv
$mv: /bin/mv /usr/share/man/man1/mv.1.gz <--Out put for above command is like this

So, the command binary of the command is resides in the folder /bin/

2. Now issue the following command to find out the package which provides 'mv' command
$dpkg -S
EX:$dpkg -S /bin/mv
$coreutils: /bin/mv <-- Output for above command is like this

So, the package(name) that provides mv is "coreutils".

Thats it.. :)